Laundry Cabinets with Hanging Rod Assembly Guide - LP60 IMPORTANT NOTES Before you start, inspect all panels and hardware to ensure you have everything needed. We recommend laying the panels on some cardboard to protect the finish when assembling. In addition to the pre-installed hardware, we recommend adding a bead of white wood glue in the dado grooves, to create the strongest cabinet. www.millspride.
Laundry Cabinets with Hanging Rod - LP60 PARTS 2 x Face Frames with Pre-installed Hardware 2 x Back Panels with Pre-installed Hardware 4 x End Panels with Pre-installed Hardware 2 x Doors G F 1 x Adjustable Hanging Rod 2 x Adjustable Shelves 4 x Fixed Shelves H I 4 x Soft Close Hinges J 8 x Locking Shelf Rests 4 x Clear Bumpers 32 - #6 x 1/2" Pan Head Screws 8 - #6 x 5/8" Flat Countersink Screws 4 - #8 x 7/8" Pan Washer Head Screws 8 - #6 x 1" Flat Countersink Screws www.millspride.
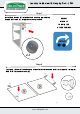
Laundry Cabinets with Hanging Rod - LP60 Step 1 Start by laying Frame (A) face down on a smooth flat surface. Insert the front edges of (2) End Panels (C) into the vertical grooves in the Frame (A), so the L-Brackets and Connector Plates ‘snap’ together. Align the panels so the grooves line up and tighten the Connector Plate Screws. Then, secure the Connector Plates with (8) #6 x 1/2" Pan Head locking screws (L).
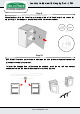
Laundry Cabinets with Hanging Rod - LP60 Step 3 Apply beads of glue and carefully install Back Panel (B) into grooves in rear of End Panels (C), so that L-Brackets and Connector Plates snap together. Ensure Fixed Shelves (E) slot into grooves in Back Panel (B). Step 4 Carefully, turn the cabinet over and tighten the Connector Plate screws holding the Back Panel (B) in place. Lock the plates and L-brackets together using (8) #6 x 1/2" Pan Head locking screws (L). www.millspride.
Laundry Cabinets with Hanging Rod - LP60 Step 5 Turn the cabinet over again and insert (4) #6 x 1” Flat Head screws (O) through holes in Back Panel (B). Tighten securely into Fixed Shelves (E). Step 6 Insert (4) Locking Shelf Rests (I) in desired location and install Adjustable Shelf (F). F www.millspride.
Laundry Cabinets with Hanging Rod - LP60 Step 7 Install Rod Socket (K) in the desired location, immediately behind the Frame (A), using the screws provided. K REPEAT STEPS 1-7 TO BUILD THE OTHER CABINET REPEAT - Step 8 Lay the (2) Doors (D) face down on a smooth flat surface and install (4) Hinges (H) using (8) #6 x 5/8” Flat Head screws (M). www.millspride.
Laundry Cabinets with Hanging Rod - LP60 Step 9 Attach the Door (D) to the Face Frame (A) using (4) #8 x 7/8” Pan Washer Head screws (N) and install (2) Clear Bumpers. Repeat the process on the other cabinet. Step 10 IMPORTANT! Consult a professional to determine the best hardware required to mount the (2) cabinets securely to your wall. To install the Hanging Rod (G) between the cabinets, insert the rod into one bracket, extend the rod into the other bracket and twist it to lock in place. G www.