® Milestone XProtect Axis T8310 Controller Smart Client Plug-in User’s Manual
Milestone XProtect® Axis T8310 Controller Smart Client Plug-in Target Audience for this Document This document is aimed at users of the Milestone XProtect Smart Client, and provides descriptions of how to install and maintain the plug-in for Axis T8310 Controller in the Smart Client. www.milestonesys.
Milestone XProtect® Axis T8310 Controller Smart Client Plug-in Contents COPYRIGHT, TRADEMARKS & DISCLAIMERS ............................. 4 INTRODUCTION ............................................................................... 5 INSTALLATION ................................................................................ 6 VIDEO SURVEILLANCE CONTROL BOARD INSTALLATION ....... 7 CONFIGURATION & LICENSING .................................................... 8 License File ..........................
Milestone XProtect® Axis T8310 Controller Smart Client Plug-in Copyright, Trademarks & Disclaimers Copyright © 2013 Milestone Systems A/S. Trademarks XProtect is a registered trademark of Milestone Systems A/S. Microsoft and Windows are registered trademarks of Microsoft Corporation. All other trademarks mentioned in this document are trademarks of their respective owners. Disclaimer This document is intended for general information purposes only, and due care has been taken in its preparation.
Milestone XProtect® Axis T8310 Controller Smart Client Plug-in Introduction Axis T8310 is a video control station that enables users to view and control cameras and video recorders at local and remote facilities.The reader of this document should have knowledge of the AxisT8310 operation. A full description of the AxisT8310 is found in a separate document, ug_T81series_38417_en_1002.pdf, available from Axis Communications.
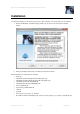
Milestone XProtect® Axis T8310 Controller Smart Client Plug-in Installation The Smart Client plug-in for AxisT8310 keyboard comes with an installer. To install the plug-in, do the following: 1. Double-click Milestone_AxisT8310_Plugin_Installer_x64_en-US.msi. This will start the installation wizard. 2. When the installation wizard starts, click Next, and complete the wizard. During installation, the following files are installed: • plugin.def • VideoOS.RemoteClient.Plugin.AxisT8310.
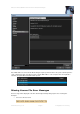
Milestone XProtect® Axis T8310 Controller Smart Client Plug-in Video Surveillance Control Board Installation AXIS T8310 Video Surveillance Control Board consists of three units that can be installed separately. All the units are powered through the USB connection. To install the AXIS T8310 Video Surveillance Control Board, plug the AXIS T8310 Video Surveillance Control Board into the USB port on your PC. www.milestonesys.
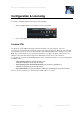
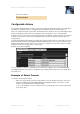
Milestone XProtect® Axis T8310 Controller Smart Client Plug-in Configuration & Licensing To show the configuration window of the plug-in, do the following: 1. Click the Options button in the top right corner of the Smart Client. 2. In the popup Options form, select Axis T8310 Keyboard Setup. License File The ‘About’ tab shows additional information related to the plug-in such as licensing info, version etc.
Milestone XProtect® Axis T8310 Controller Smart Client Plug-in Note: MAC addresses are listed in the About dialogTo acquire a permanent license file, please submit a purchase order, containing the SLC of the XProtect Server and the MAC address of the computer where the keyboard is attached, through the Milestone Online Order System. Missing License File Error Messages Error messages will be displayed on the Axis T8310 Keyboard Setup dialog only if license checking fails.
Milestone XProtect® Axis T8310 Controller Smart Client Plug-in • If license has expired: Configurable Actions The AxisT8310 Smart Client Plug-in contains a method for sending user-defined instructions to the Smart Client. The number of configurable actions is configurable, but currently limited to 640. The default value is 12. Actions are configured using the setup module, described later in this document.
Milestone XProtect® Axis T8310 Controller Smart Client Plug-in • Configure action from the setup module. This action is set to KEYPAD_CAMERA by default. • The function can be activated by pressing a number followed by pressing KEYPAD_CAMERA on the device. E.g. press 65 and KEYPAD_CAMERA will switch to camera with shortcut ‘65’. Example of Select Monitor To configure “Select Monitor” function, • Make sure view number (shortcut) is defined, which are used to identify each view.
Milestone XProtect® Axis T8310 Controller Smart Client Plug-in Joystick Options For joystick setup, please see the Smart Client’s built-in help system, under Options > Joystick Options. Profile Options The current setting is stored privately on the server. But it can be transferred to the shared profile, meaning that the settings will be applied to everyone who intends to use this profile. A message dialog will be displayed if profile changes.
Milestone XProtect® Axis T8310 Controller Smart Client Plug-in Profile can also be imported from previous version by clicking the ‘Import’ button on right bottom of the Setup form. This button is only visible if the previous profile exists. Profile can always be reset to default by clicking the ‘Default’ button. www.milestonesys.
Milestone XProtect® Axis T8310 Controller Smart Client Plug-in Default Settings Default settings can be activated by clicking the Default settings button from the setup form. The default settings include: • Generic actions (number 1- 12): o all not assigned • AxisT8310 spec: o Alt - Select Generic number.
Milestone Systems offices are located across the world. For details about office addresses, phone and fax numbers, visit www.milestonesys.com.