
User's Manual
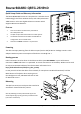

Seewww.routerboard.com formore information. Contactsupport@mikrotik.com forsupportquestions. 21/08/13
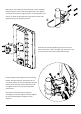
Buttons and Jumpers
� RouterOS reset jumper hole (access throughthe plastic door) – resets RouterOS software to defaults.
Must short circuit the metallic sides of the hole (with a screwdriver, for example) and boot the device.
Hold screwdriver in place until RouterOS configuration is cleared.
� RouterBOOT reset button(access throughthe plastic door)has two functions:
Hold this button during boot time until LEDlight starts flashing,
release the button to reset RouterOS configuration (same resultas with resethole)
Hold this button during boot time longer, until LEDturns off,
and then releaseit to makethedevicelookforNetinstallservers.
Operating System Support
Currently tested operating system is MikroTik RouterOS (starting from version v5.20).
Copyright and Warranty Information
Copyright and Trademarks. CopyrightMikroTikls SIA. This manual contains information protected by
copyrightlaw. No partof itmay be reproduced or transmitted in any form withoutprior written
permission from the copyrightholder. RouterBOARD, RouterOS, RouterBOOT and MikroTik are
trademarks of MikroTikls SIA. All trademarks and registered trademarks appearing in this manual are the
property of their respective holders.
Hardware. MikroTikls SIA warrants all RouterBOARD series equipmentfor the term of fifteen (15)
months from the shipping date to be free of defects in materials and workmanship under normal use
and service, exceptin case of damage caused by mechanical, electrical or other accidental or intended
damages caused by improper use or due to wind, rain, fire or other acts of nature.
If you have purchased your productfrom aMikroTik Reseller, please contactthe Reseller company
regarding all warranty and repair issues, the following instructions apply ONLY if you purchased your
equipmentdirectly from MikroTik Latvia
To return failed unitor units to MikroTikls you mustperform the following RMA (Return Material
Authorization) procedure. Follow the instructions below to save time, efforts, avoid costs, and improve
the speed of the RMA process.
Instructions are located on our webpage here: http://rma.mikrotik.com
Manual. This manual is provided “as is” withoutawarranty of any kind, expressed or implied,including,
butnotlimited to, the implied warranty of merchantability and fitness for aparticular purpose. The
manufacturer has made every effortto ensure the accuracy of the contents of this manual; however, it
is possible thatitmay contain technical inaccuracies, typographical or other errors. No liability is
assumed for any inaccuracy found in this publication, nor for director indirect, incidental, consequential
or other damages thatmay resultfrom such an inaccuracy, including, butnot limited to, loss of dataor
profits. Please reportany inaccuracies found to support@mikrotik.com