
Installation Instructions
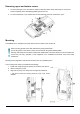
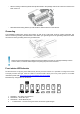
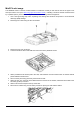
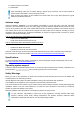
Table Of Contents
- Quickstart
- Powering
- MikroTik mobile app
- Removing upper and bottom covers
- Mounting
- Grounding
- Front status LED behavior
- Configuration
- Expansion slots and ports
- Reset button
- Accessories
- MiniPCIe slot usage
- Antenna usage
- Specifications
- Operating system support
- Safety Warnings
- Federal Communication Commission Interference Statement
- Innovation, Science and Economic Development Canada

• When mounting on DIN rail, please find special bracket in the package and secure it with four screws to the
back of the unit.
• With attached mounting bracket you will be able to slide the device on the DIN rail.
Grounding
The installation infrastructure (towers and masts), as well as the router itself, must be properly grounded. The
device includes a grounding wire attachment screw. Attach your grounding wire to the grounding screw, then attach
the other end of the grounding wire to the grounded mast.
Please secure all loose Ethernet cables and antenna cables to the pole or mast approximately at 30cm
from the device, so that the cable weight is not pulling the ports and connectors.
Front status LED behavior
RouterOS allows configuring each LEDs activity the way that user wishes. It is possible to configure the LEDs
to display wireless strength, blink the LEDs on interface traffic activity and many other options. For further
information please visit https://wiki.mikrotik.com/wiki/Manual:System/LEDS
Default factory configuration for this device:
1. Solid Blue – The device is powered on.
2. Solid Green – Active SFP port.
3. Solid Green – Active Ethernet port.
4. - 8. Solid Green – The set of five green LEDs, shows the signal strength.
See mikrotik.com/products for the latest version of this document. Page 3, Document #53381 Modified on: 30.JAN.2020