
How-To Guide
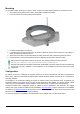

Table Of Contents
- Connecting
- Removing mounting ring
- Powering
- Mounting
- Configuration
- Expansion slots and ports
- Buttons and jumpers
- Reset button
- Mode button
- LED indicators
- Accessories
- Specifications
- Operating system support
- MikroTik mobile app
- Federal Communication Commission Interference Statement
- Innovation, Science and Economic Development Canada

Mounting
It is possible to attach the device to a wall or ceiling, using the provided mounting bracket on the back of the unit:
1. Attach the mounting bracket to the wall or ceiling with provided three screws;
2. Use 5 mm drill bid if necessary with provided dowels;
3. Connect needed cables to the device;
4. If needed second mounting bracket can be used for additional support when working on thin ceilings or
walls, provided screw length is 20 mm;
5. Attach the second mount to the other side of the ceiling and secure with screws through the first mount;
6. Attach the device to the mounting bracket and turn clockwise until the device secures in place;
We recommend using Cat5/6 cable for our devices. The IP rating scale for this device is IPX0.
Mounting and configuration of this device should be done by a qualified person.
Warning! This equipment should be installed and operated with a minimum distance of 20 cm between the
device and your body. Operation of this equipment in the residential environment could cause radio
interference.
Configuration
By default, the device is configured as a wireless access point, with the first ethernet port (Eth1) configured as a
DHCP client, and the second interface bridged together with the wireless interface. A DHCP server is configured on
the bridge interface.
Once logged in, we recommend clicking the “Check for updates” button in the QuickSet menu, as updating your
RouterOS software to the latest version ensures the best performance and stability. For wireless models, please
make sure you have selected the country where the device will be used, to conform with local regulations.
RouterOS includes many configuration options in addition to what is described in this document. We suggest
starting here to get yourself accustomed to the possibilities: http://mt.lv/help. In case IP connection is not available,
the Winbox tool (http://mt.lv/winbox) can be used to connect to the MAC address of the device from the LAN side
(all access is blocked from the Internet port by default).
For recovery purposes, it is possible to boot the device from the network, see a section Reset button.
See mikrotik.com/products for the latest version of this document. Document #50187 Modified on: 05.NOV.2019