
Mounting instructions

All pictures shown are for illustration purpose only
cAP XL ac mounting instruction
1.
2.
3.
4.
1.
1. Drill two 4.5-5mm holes for anchors [1]. Insert
plastic anchors into the holes [2]. Attach the mount
[3] and secure the mount with screws [4].
2.
1.
2.
2. Connect ethernet cable with product, then attach product to the mount.
3.
3. When the product is attached on the mount, pull it down until it snaps
into place.
Wall: version 1
1.
2.
3.
4.
1.
~45mm
1. Drill two 4.5-5mm holes for anchors [1]. Insert plastic
anchors into the holes [2]. Attach the mount [3] and
secure the mount with screws [4].
3.
3. When the product is attached on the mount, pull it down until it snaps
into place.
2. Connect ethernet cable [1] with product, then attach product to the mount.
1.
2.
2.
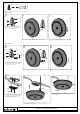
Wall: version 2
1.
2.
3.
5.
4.
1.
1. Drill two 4.5-5mm holes for anchors [1] and 8mm
hole for ethernet cable [2]. Attach sheet metal plate in
other side of ceilling panel [3], and with screws [5]
tighten together with mount part [4].
3.
3. When the product is attached on the mount, push it in showing direction
until it snaps into place.
1.
2.
3.
2. Insert ethernet cable [1] through sheet metal loop and drill hole. Connect cable
with product [2]. Attach on the mount [3].
2.
Ceiling
Part List
2x1x 2x 1x