
Assembly instructions

Installation Guide
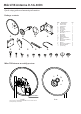
0. Items Required
• 10mm Wrench • 17mm Wrench • PH2 Screw Driver • This guide is written to
be used with a MikroTik RB900 series outdoor device (sold separately) •
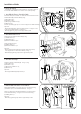
1. Install Back Plate to Parabolic Dish
Polarization slant option available - see instruction on www.routerboard.com
Install Back Plate [D] to Parabolic Dish [A] using:
[J] M6x20 Bolt x 4 pcs;
[P] M6 Washer x 4 pcs;
[O] M6 Spring Lock Washer x 4 pcs;
[N] M6 Nut x 4 pcs;
Insert the Square Plugs [T] x 4 pcs to cover the empty holes in Parabolic dish [A]
Important:
• Align Parabolic Dish [A] to get H/V polarization layout - see Figure 1.1 & 1.2
or +45°/-45° polarization layout - see Figure 1.2;
• M6 Nut [N] tightening torque must be approximately 5 Nm.
2. Install Antenna Feed
Install Antenna Feed [B] to Parabolic Dish [A] using:
[C] Feed Bracket x 1 pc;
[K] M4x12 Bolt x 4 pcs;
[M] M4 Serrated Washer x 4 pcs.
Install grounding fasteners:
[L] M6 Wing Nut x 1 pc;
[M] M4 Serrated Washer x 1 pc.
Important:
• Antenna Feed [B] and Feed Bracket [C] must be aligned respectively
to the alignment bore in the Parabolic Dish [A] - see Fig. 2;
• M4x12 Bolt [N] tightening torque must be approximately 2 Nm.
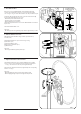
3. Install Pole Clamp
Install Pole Clamp [E] to Back Plate [D] - see Fig. 3, using:
[J] M6x20 Bolt x 1 pc;
[P] M6 Washer x 1 pc;
[O] M6 Spring Lock Washer x 1 pc;
[N] M6 Nut x 1 pc.
Important:
• Do not tighten M6 Nut [N] rmly until step 7.
4. Attach MikroTik Radio to Back Plate
Attach a MikroTik RB900 series outdoor device to Case Holder [F] using:
[-] M3x8 Bolt x 4 pcs (Comes with MikroTik Radio) - see Fig. 4.1.
Attach Case Holder [F] to Back Plate [D] by tting Case Holder’s hinges
into the Back Plate’s ange - see Fig. 4.2. Secure Case Holder using:
[L] M4 Wing Nut x 1 pc.
Important:
• M3x8 Bolt [-] tightening torque must be approximately 1.5 Nm.
FIG. 2
L C
MK
B
FIG. 3
J E
O N
D P
D
FIG. 4.2FIG. 4.1
M3x8F
L
FIG. 1.1
N
O
P
A
D
J
T
FIG. 1.3
ALIGNMENT FOR
+45°/-45° POL LAYOUT
ALIGNMENT FOR
H/V POL LAYOUT
FIG. 1.2