
User manual


20 l
Robotics experiment with PIC microcontroller
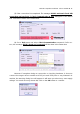
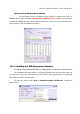
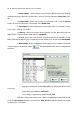
(a) Project Name : Put the project name. mikroC IDE will create the folder to
support your project file which includes the C sourcecode. For example is Blink_LED project
file.
(b) Project Path : Select the location of your project file. Click the Browse
button to select the location. For example is D:\ROBO-PICA
(c) Description : Put the information of your porject file. For example is “Robo
PICA Code Blinking LED on RB3”
(d) Device : Select the target microcontroller. For the Robo-PICA kit and
RBX-877V2.0 Controller board must select to PIC16F887
(e) Clock : Select the clock frequency for the target microcontroller. For the
Robo-PICA kit and RBX-877V2.0 Controller board use 20MHz clock. Put the value 020.000000.
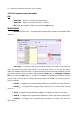
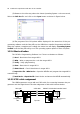
(f) Device Flags : Set the configuration for the target microcontroller. Developer
can set very easy by Default button
. The Default will set the 3 main configurations
as follows :
High Speed Oscillator enabled (HS_OSC) for 10MHz and above clock
frequency.
Watchdog timer disabled (WDT_OFF)
Low Voltage Programming disabled (LVP_OFF)
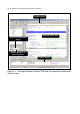
After the configuration is being set, click on the OK button. mikroC IDE would
close the New Project window and create the Blink_LED.C file with the blank editor area
for writing the C program.