
Specifications

mikroElektronika | Free Online Book | PIC Microcontrollers | Appendix B: Examples
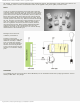
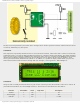
Quick burning
Like any other diode, LEDs have two ends an anode and a cathode. Connect it properly to a power supply voltage. The
diode will happily emit light. Turn it upside down and apply the same power supply voltage (even for a moment). It will
not emit light- NEVER AGAIN!
Slow burning
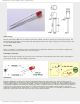
There is a nominal, i.e. maximum current determined for every LED which should not be exceeded. If it happens, the
diode will emit more intensive light, but not for a long time!
Something to remember
Similar to the previous example, all you need to do is to discard a current limiting resistor shown below. Depending on
power supply voltage, the effect might be spectacular!
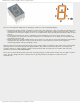
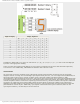
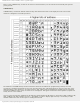
LED DISPLAY
Basically, LED display is nothing more than several LEDs moulded in the same plastic case. There are many types of
displays composed of several dozens of built in diodes which can display different symbols. The most commonly used is so
called 7-segment display. It is composed of 8 LEDs- 7 segments are arranged as a rectangle for symbol displaying and there
is an additional segment for decimal point displaying. In order to simplify connection, anodes or cathodes of all diodes are
connected to the common pin so that there are common anode displays and common cathode displays, respectively.
Segments are marked with the letters from a to g, plus dp, as shown in figure below. On connecting, each diode is treated
separately, which means that each must have its own current limiting resistor.
http://www.mikroe.com/en/books/picmcubook/appb/ (7 of 54)5/3/2009 11:36:02 AM