
Installation manual


14
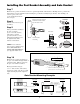
Verify the Position of the Gate
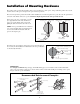
Bracket and Post Bracket Assembly:
With the gate in the open position, make sure the following
conditions are met:
1 The opener is level.
2 The 4
1
/2" x 4
1
/2" setback measurement is correct .
3 There is sufficient clearance between opener and gate in the
open and closed positions.
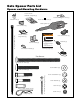
Hairpin Clip
Post Bracket Assembly
Opener
Post Pivot Bracket
Washer
Clevis Pin
Rear Mount
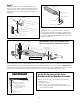
Step 7
Attach the gate bracket to the front mount of the opener
using a clevis pin, washer and hairpin clip. Now attach the
rear mount of the opener to the post pivot bracket, that is
clamped to the fence post, using the clevis pin washer and
hairpin clip.
Level Opener
Fence Post
Gate In Open Position
Push Pull Tube
Fully Retracted
LEVEL horizontal cross member
Post Bracket Assembly
Gate Bracket
®
E-Z GATE OPENER
250
U
L
3
2
5
S
E
R
I
E
S
Can Cause Injury or Death
M
O
V
IN
G
G
A
T
E
L
I
S
T
E
D
®
U
S
Clevis Pin
Hairpin Clip
Washer
Gate Bracket
Front Mount
IMPORTANT: Make sure Push Pull Tube is
fully retracted as shown. Rotate if necessary.
With the gate in the open position (80º to 110º from its
closed position), adjust the post bracket assembly and gate
bracket until the opener is level. While holding the opener
level, use C-clamps to temporarily attach the gate bracket in
it's position on the gate.
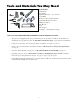
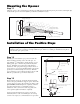
IMPORTANT
Closed Position
Open Position
Make sure there is
adequate clearance
between opener and
gate in the open and
closed positions
After verifying that you have complied with the 4
1
/2" x 4
1
/2" setback, insert the
5
/16" x 1
3
/4" bolt through the aligned holes
of the post bracket and post pivot bracket (illustrated below) and fasten it with the
5
/16" washer and nut. IMPORTANT: If
you loosened the clamp on the post bracket assembly to achieve the 4
1
/2" x 4
1
/2" setback, tighten it in its new position and
recheck the gate bracket with the gate in the open position (move the gate bracket and re-clamp it if necessary).