
Installation manual


13
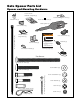
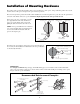
Examples of a 4
1
/2" x 4
1
/2" Setback
4 1/2"
4 1/2"
Center of Gate Hinge
90
o
GATE
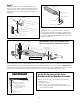
5/16" x 1 3/4" bolt
Post Bracket
Post
Pivot Bracket
Washer
Fence Post
Fence Post
Post
Bracket
Post
Pivot Bracket
5/16" x 1 3/4"
Bolt
Washer
4 1/2"
4 1/2"
Center of Gate Hinge
90
o
GATE
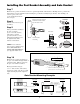
Determining the Mounting Position
of the Post Bracket Assembly and the Gate Bracket
Step 4
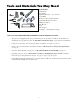
Insert the
3
/8" x 2" bolt through the center hole of the post brackets and post
pivot bracket as shown. Fasten a
3
/8" washer, lock washer and nut on the end
of the bolt. DO NOT overtighten the nut because the post pivot bracket will
have to be adjusted later.
3/8" x 2" Bolt
3/8" Nut
Post Pivot Bracket
Post Bracket
Post Bracket
3/8" Lock Washer
Post Bracket Assembly
3/8" Washer
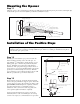
Step 5
Holding the post pivot bracket assembly on the fence post, place one end of
setback template over center of gate hinge and the other end of template over
the post pivot bracket hole (either of the two mounting holes in post pivot
bracket can be used) where the opener will be attached. Be sure to hold the
template at a 90º angle between these two points and measure 4
1
/2" back
from the center of the gate hinge. You will need to rotate the post pivot
bracket or the entire post bracket assembly to align it with the square angle
of the template (see the examples below). THE ANGLE BETWEEN THE
GATE HINGE AND THE POST PIVOT BRACKET MUST MATCH
THE ANGLE OF THE SETBACK TEMPLATE.
Fence Post
Post Bracket Assembly
Step 6
Use C-clamps to temporarily attach the post bracket
assembly to the fence post in the position that best
satisfies the 4
1
/2" x 4
1
/2" setback.
Step 3
Study the 4
1
/2" x 4
1
/2" setback template (see insert) provided with this manual. Once you are familiar with its
illustrations, cut and save the template from the insert. The template will determine the correct position of the post pivot
bracket before mounting the opener on the fence post.
NOTE: If you move the post pivot bracket, be sure one of the post bracket holes is
aligned with the rest of the assembly (the center hole should already have a bolt
through it). Flipping the Post Pivot Bracket over gives more position options.