
Safety & Operating Instructions


3-POINT HITCH
Mighty Mac
Gravity Self-Feeding
CHIPPER
22
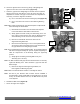
Upper TPH
Support
Bolt and
Locknut
Belt
Guard
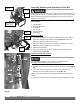
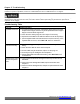
Removing, Replacing and Adjusting the Drive Belt
Disengage PTO, shut down the tractor engine, remove the key, wait for all
moving parts to come to a complete stop, disconnect the PTO shaft from the
tractor, then wait 5 minutes before performing any maintenance procedure or
inspection on the chipper.
Bolts and
Washers (2 on
opposite side)
Figure 27
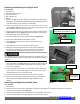
Belt
Eye Bolt
Tension
Nut
Figure 28
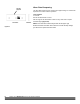
PTO
Sheave
Flywheel
Sheave
Idler
Pulley
Tools Needed:
•
Tape Measure
•
Two 9/16" Wrenches
•
1/2" Wrench
•
7/16" Wrench
•
1/8" Allen Wrench
•
Straightedge
Removing the Belt
1.
Use two 9/16" Wrenches to remove the Bolt and Locknut securing the
Upper TPH Support to the Chipper Housing (Figure 28). Rotate the
Upper TPH Support up and out of the way.
2.
Use a 1/2" Wrench to remove the four Bolts, Lock Washers, and Flat
Washers securing the Belt Guard to the Frame.
3.
Remove the Belt Guard.
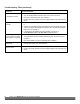
4.
Use a 1/2" Wrench to Loosen the Tension Nut until the Belt can be
easily removed (Figure 29).
Installing and Adjusting the Belt
Use only MacKissic Belts on your machine. The belts have been
thoroughly tested and proven for many hours of use.
1.
Install the new Belt onto the Sheaves and Idler Pulley as shown (Figure
30).
2.
Use a 1/2" Wrench to Tighten the Tension Nut until the distance
between the Tension Spring Hooks is 5-1/4" (Figure 30).
Note: Loosen the Locking Nut as needed to get the spring to the proper
tension.
3.
Tighten the Locking Nut to secure when the proper adjustment is made.
Figure 29
5-1/4"
Nut
Nut
Upper TPH
Support
Bolt and
Locknut
Belt
Guard
Bolts and
Washers (2 on
Opposite side)
Flywheel
Sheave
Idler
Pulley
PO
Sheave