
Safety & Operating Instructions

CONTACT US AT
www.MacKissic.com
19
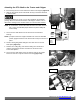
To Free a Jammed Flywheel
Disengage PTO, shut down the tractor engine, remove the key, wait for all moving parts to come to a complete stop,
disconnect the PTO shaft from the tractor, then wait 5 minutes before moving or performing maintenance/inspection on
the chipper.
Never pry against the scroll weldment when removing the deflector or discharge chute, or at any other time. This will
cause damage to the machine.
Tools Needed:
•
Two 1/2" Wrenches
Disassemble:
1.
Disconnect the PTO Shaft.
2.
Remove any material left in the Chipper Hopper.
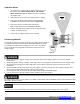
3.
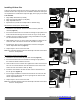
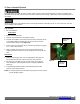
Remove the two Bolts and Locknuts that secure the Discharge Chute
to the Chipper Basic Assembly with two 1/2" wrenches and then
remove the Discharge Chute (Figure 24).
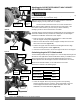
4.
Check to see if the Discharge Chute or Discharge opening is clogged.
If it is, clear it with a branch.
5.
With a wooden stick, loosen and remove any material left in the
Chipping Chamber and make sure the Flywheel turns freely with the
stick.
Reassemble:
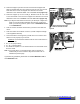
1.
Position the Discharge Chute onto the Chipper Basic Assembly and
secure
with two Bolts and Locknuts using two 1/2" wrenches.
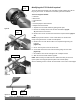
2.
Reconnect the PTO Shaft, start the Tractor engine and engage the
PTO;
allowing the remaining material in the Chipping Chamber to
discharge.
3.
If the Chipping Chamber doesn’t clear and the flywheel is still
jammed, repeat above process.
NOTE:
Be certain the Flywheel turns freely before trying to process more material
into the Chipper Hopper.
Figure 24
Bolts and
Locknuts
Discharge
Chute