
Safety & Operating Instructions

CONTACT US AT
www.MacKissic.com
11
Installing Lift Arm Pins
There are two styles of Pins we use for the Lift Arm Pins. One style has a
shoulder and the other style does not. Installation methods for both styles
are explained here so follow the steps that apply to the style you received.
Tools Needed:
•
Large Philips Screwdriver (or Shaft)
•
Large Flat Head Screwdriver (or Pry Bar)
•
Large Adjustable Wrench
•
Tape Measure (needed to install pin with no shoulder only)
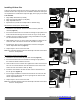
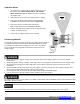
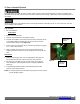
PIN INSTALLATION (WITH SHOULDER)
1.
Position the Lock Washer and the Hex Nut inside the plate and
channel (Figure 6).
2.
Insert the threaded end of the Lift Arm Pin through the pin plate of the
frame and thread it through the Hex Nut as far as you can by hand.
3.
Hold the Hex Nut in place by inserting a large Screwdriver or Pry Bar
into the Channel and under the Nut.
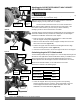
4.
While holding the Hex nut, insert a large Screwdriver or Shaft into the
hole at the end of the Pin and turn the Pin clockwise until tight.
5.
Install the thin Hex Nut at the threaded end of the Pin and tighten
with an Adjustable Wrench (Figure 7).
6.
Repeat steps 1 thru 5 for the other side.
Note:
The orientation (pointing vertical or horizontal) of the hole at the end of
the
Pin is not important.
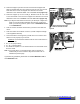
PIN INSTALLATION (NO SHOULDER)
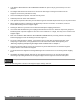
1.
Position the Hex Nut inside the plate and channel (Figure 8).
2.
Insert the threaded end of the Lift Arm Pin through the pin plate of
the frame and thread it into the Hex Nut.
3.
Push the Pin in so the Locknut rests against the Frame and screw the
Pin in or out until the distance from the Pin Plate to the center of the
hole in the end of the Pin is 2-3/16" (1.1875).
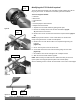
4.
Install the Lock Washer and thin Hex Nut onto the threaded end of
the Pin by hand (Figure 9).
5.
Insert a large Screwdriver or Shaft into the hole at the end of the Pin
and to ensure the Pin does not turn as you tighten the thin Hex Nut
with an adjustable Wrench.
6.
Repeat steps 1 thru 5 for the other side.
Note:
The orientation (pointing vertical or horizontal) of the hole at the end of
the
Pin is not important.
Frame
Hex Nut
Lock Washer
Screwdriver
or Pry Bar
Figure 6
Figure 7
Figure 8
Thin Hex
Nut
Lock
Washer
Screwdriver
or Shaft
Lift Arm
Pin
Hold in
Position
Figure 9
Hex Nut
2-3/16"
Screwdriver
or Shaft
Lift Arm
Pin
Hex Nut
Lock Washer
Screwdriver
or Pry Bar
Lift Arm
Pin
Hex Nut
Against frame
Hold in
Position
Lock
Washer