
Safety & Operating Instructions


3-POINT HITCH
Mighty Mac
Gravity Self-Feeding
CHIPPER
10
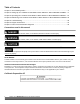
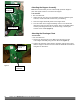
Figure 4
Figure 5
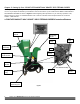
Attaching the Hopper Assembly
Note:
We recommend that you have someone help you lift the Hopper in
place and
support it until it is secured to the Chipper.
Tools Needed:
•
One 1/2" Wrenches
1.
Gather x8 5/16- 18 x 3/4” Truss Head Bolts, x8 5/16- 18 Think Nylon
Locknuts, and x8 5/16 SAE washers from your Bolt Bag.
2.
Place the Hopper Assembly inside of the Hopper Neck.
3.
From the inside of the Hopper Assembly, Insert a Truss Head Bolt
through the holes (x4 each side of Hopper), place a 5/16 SAE washer
over the protruding bolt threads, and secure using a Think Nylon
Locknut on the outside (Figure 4).
Attaching the Discharge Chute
Tools Needed:
•
Two 1/2" Wrenches
1.
Remove the two 5/16-18 x 4-1/4" Bolts and Locknuts at the top
of the Chipper Assembly using two 1/2" Wrenches (Figure 5).
2.
Position the Discharge Chute with the discharge opening facing away
from the Hopper as shown and secure with the two Bolts and Locknuts
using two 1/2" Wrenches.
Bolts and
Locknuts
Discharge
Chute
Hopper Assembly
Install
Hardware
Hopper Neck