
Operating instructions/Installation instructions
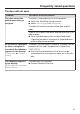
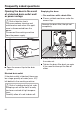
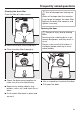
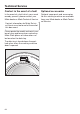
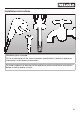
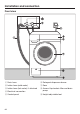


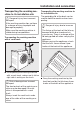
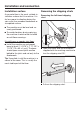
Table Of Contents
- Contents
- Caring for the environment
- IMPORTANT SAFETY INSTRUCTIONS
- Operating the washing machine
- Initial commissioning
- Emptying the drum
- Switching on the washing machine
- Setting the display language
- Reference to external appliances
- Setting the display brightness
- Setting the date
- Confirming the time request
- Setting the time
- Selecting program packages
- Setting up a payment system
- Selecting pre-wash water
- Selecting main wash water
- Removing the shipping struts
- Completing the commissioning process
- 1. Preparing the laundry
- 2. Loading the washing machine
- 3. Selecting a program
- 4. Selecting program settings
- 5. Adding detergent
- 6. Starting a program – end of a program
- Timer
- Program chart
- Extra options
- Special features in the program sequence
- Changing the program sequence
- Cleaning and care
- Frequently asked questions
- Technical Service
- MIELE
- Installation and connection
- Technical data
- Supervisor level

Installation and connection
*INSTALLATION*
70
Installation surface
A concrete floor is the most suitable in-
stallation surface for this machine. It is
far less prone to vibration during the
spin cycle than wooden floorboards or
a carpeted surface.
The machine must be level and se-
curely positioned.
To avoid vibrations during spinning,
the machine should not be installed
on soft floor coverings.
If installing on a wooden joist floor:
Install the machine on a plywood
base (at least 2' 3 9/16" x 1' 11 5/8" x
1 3/16" (70x60x3cm)). The base
should span several joists and be
bolted to the joists and not only to the
floorboards.
Tip: If possible, install the machine in a
corner of the room. This is usually the
most stable part of the floor.
Removing the shipping struts
Removing the left-hand shipping
strut
Open the cover and use the wrench
supplied with the washing machine to
turn the shipping strut 90°.
Pull out the shipping strut.