
Operating and Installation Instructions
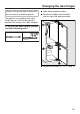
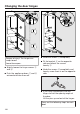
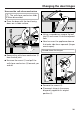
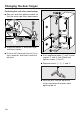
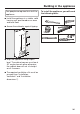
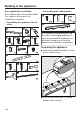
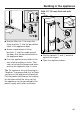
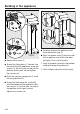

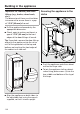
Table Of Contents
- Contents
- IMPORTANT SAFETY INSTRUCTIONS
- Caring for the environment
- How to save energy
- Guide to the appliance
- Accessories
- Switching on and off
- The correct temperature
- Using Automatic SuperCool and SuperFreeze
- Temperature and door alarm
- Selecting additional settings
- Storing food in the refrigerator section
- Storing food in the PerfectFresh Pro zone
- Adjusting the interior fittings
- Freezing and storing food
- Making ice cubes
- Automatic defrosting
- Cleaning and care
- Frequently Asked Questions
- Causes of noises
- Technical Service
- Information for dealers
- Water connection
- Electrical connection
- Installation information
- Installation dimensions
- Limiting the opening angle of the appliance doors
- Changing the door hinges
- Building in the appliance

Building in the appliance
107
Use the Allen key to screw the
fixing brackets into the pre-drilled
holes in the appliance door.
Screw a second pair of fixing
brackets into the handle area of
the door. Use the pre-drilled holes in
the appliance door.
Push the appliance two-thirds of the
way into the building-in niche. Take
care not to trap the power cord when
pushing the appliance into its niche.
Tip: Tie a piece of string to the plug to
“lengthen” the power cord; this will help
you to push the appliance into position.
Pull the power cord through the cabinet
by the other end of the string so that
the appliance can be connected to the
power supply easily after installation.
With 5/8" (16mm) thick unit walls
only:
Clip the spacers and onto the
right of the hinges.
Open the appliance doors.