
Operating and Installation Instructions

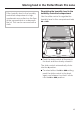
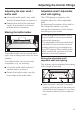
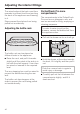
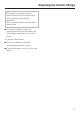
Table Of Contents
- Contents
- Caring for the environment 2
- Guide to the appliance 6
- Warning and Safety instructions 10
- How to save energy 19
- Switching the appliance on and off 21
- The correct temperature 25
- Using SuperCool and SuperFreeze 29
- Temperature and door alarm 32
- Further settings 34
- Using the refrigerator efficiently 39
- Storing food in the PerfectFresh Pro zone 41
- Adjusting the interior fittings 45
- Freezing and storing food 48
- Making ice cubes 52
- Automatic defrosting 56
- Cleaning and care 57
- Problem solving guide 65
- Noises 77
- After Sales / Warranty 78
- Information for Miele Centers and Chartered Agents 79
- Mains water connection 81
- Electrical connection 84
- Installation advice 85
- Building-in dimensions 88
- Adjusting the door hinges 89
- Changing the door hinging 90
- Installation 94
- Contact details 107

The raised edge at the back must face
upwards to prevent food from touching
the back of the appliance and freezing
to it.
Stops prevent the shelves from being
pulled out accidentally.
Adjusting the bottle rack
The bottle rack can be placed on
different levels in the appliance.
^ Raise the rack, and pull it forwards
slightly until the notch at the side is in
line with the shelf support. It can then
be raised or lowered to the required
level.
The rear stopping bar must be raised to
prevent the bottles touching the rear
wall.
The bottle rack has stoppers at the
sides to prevent the rack being pulled
out unintentionally.
PerfectFresh Pro zone
compartments
The compartments in the PerfectFresh
Pro zone are on telescopic rails, and
can be removed for filling, emptying or
cleaning purposes.
To make it easier to pull out the
drawers, remove the bottle shelf from
the appliance door.
^
Pull out the drawer as far as it will go.
^ Hold the drawer at the sides towards
the back, lift it slightly and then pull it
out.
Push the runners back in again to
avoid injury or damage.
^
Carefully pull out the lid between the
compartments slightly, and lift it
down and out.
Adjusting the interior fittings
46