Operating and installation instructions Fridge-freezer combination To prevent the risk of accidents or damage to the appliance, it is essential to read these instructions before it is installed and used for the first time. en - AU, NZ M.-Nr.
Caring for the environment Disposal of the packing material Disposing of your old appliance The transport and protective packing has been selected from materials which are environmentally friendly for disposal and can normally be recycled. Electrical and electronic appliances often contain materials which, if handled or disposed of incorrectly, could be potentially hazardous to human health and to the environment. They are, however, essential for the correct functioning of your appliance.
Contents Caring for the environment . . . . . . . . . . . . . . . . . . . . . . . . . . . . . . . . . . . . . . . . . . 2 Guide to the appliance . . . . . . . . . . . . . . . . . . . . . . . . . . . . . . . . . . . . . . . . . . . . . 6 Optional accessories . . . . . . . . . . . . . . . . . . . . . . . . . . . . . . . . . . . . . . . . . . . . . . . . 9 Warning and Safety instructions . . . . . . . . . . . . . . . . . . . . . . . . . . . . . . . . . . . . 10 How to save energy . . . . . . . . . . . . . . .
Contents Storing food in the PerfectFresh Pro zone . . . . . . . . . . . . . . . . . . . . . . . . . . . . 41 Dry compartment , . . . . . . . . . . . . . . . . . . . . . . . . . . . . . . . . . . . . . . . . . . . . . . . . 42 Humidity controlled compartment ,, ,, / ,,,. . . . . . . . . . . . . . . . . . . . . . . . . . . . . 42 Low humidity , . . . . . . . . . . . . . . . . . . . . . . . . . . . . . . . . . . . . . . . . . . . . . . . . . 42 High humidity level ,, / ,,, . . . . . . . . . . . . . . . . . .
Contents Cleaning the interior and accessories . . . . . . . . . . . . . . . . . . . . . . . . . . . . . . . . . . 63 Door seals . . . . . . . . . . . . . . . . . . . . . . . . . . . . . . . . . . . . . . . . . . . . . . . . . . . . . . . 64 Ventilation gaps . . . . . . . . . . . . . . . . . . . . . . . . . . . . . . . . . . . . . . . . . . . . . . . . . . . 64 Problem solving guide . . . . . . . . . . . . . . . . . . . . . . . . . . . . . . . . . . . . . . . . . . . . 65 Noises . . . . . . . . . . . . . .
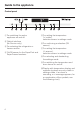
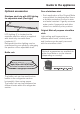
Guide to the appliance Control panel a For switching the entire appliance on and off.
Guide to the appliance Explanation of symbols Symbol Meaning Function 0 Safety lock Secures against unintended switching off of the appliance, unintended temperature adjustment, unintended switching on of SuperCool and SuperFreeze, and unintended entry of settings ® Ice cube maker Switching the ice cube maker on and off; Setting the water quantity; Rinsing the ice cube maker; Setting the cleaning position of the ice cube tray; Flashes when there is a fault with the ice cube maker ) Audible tones
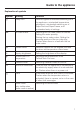
Guide to the appliance a Control panel b Fan c Egg tray / door shelf d Adjustable shelf e Adjustable shelf with lighting (FlexiLight) f Bottle shelf g PerfectFresh Pro zone interior lighting h PerfectFresh Pro zone dry compartment i Condensate channel and drain hole j Control for setting the moisture level in the humidity controlled compartment k PerfectFresh Pro zone humidity controlled compartment l Ice cube drawer with automatic ice cube maker m Freezer drawers 8
Guide to the appliance Optional accessories Stainless steel trim with LED lighting for adjustable shelf (FlexiLight) LED lighting b is located on the stainless steel trim which is supplied with electricity via metal discs (contacts) a. Refrigerator section lighting can be customised to your needs by changing the position of the adjustable shelf.
Warning and Safety instructions This appliance conforms to current safety requirements. Inappropriate use can, however, lead to personal injury and damage to property. To avoid the risk of accidents and damage to the appliance, please read these instructions carefully before using it for the first time. They contain important notes on installation, safety, use and maintenance. Miele cannot be held liable for non-compliance with these instructions.
Warning and Safety instructions ~ This appliance is not suitable for storing and refrigerating medications, blood plasma, laboratory preparations or similar substances or products. Incorrect use of the appliance may result in damage to or spoiling of the food or drinks being stored. Furthermore, the appliance must not be operated in areas where explosions may occur. Miele will not be held liable for damage resulting from incorrect or improper use or operation.
Warning and Safety instructions ~ Danger of suffocation! Children may be able to wrap themselves in packing material or pull it over their heads with the risk of suffocation. Keep children away from any packing material. Technical safety ~ The refrigerant circuit has been checked for leaks. This appliance complies with all current local and national safety requirements. ~ This appliance contains the coolant Isobutane (R600a), a natural gas which is environmentally friendly.
Warning and Safety instructions ~ The more coolant there is in an appliance, the larger the room it should be installed in. In the event of a leakage, if the appliance is in a small room, there is the danger of combustible gases building up. For every 8 g of coolant at least 1 m3 of room space is required. The amount of coolant in the appliance is stated on the data plate inside the appliance.
Warning and Safety instructions ~ This appliance must not be installed and operated in mobile installations (e.g. on a ship). ~ A damaged appliance is dangerous. Check it for any visible damage. Never install or attempt to use a damaged appliance. ~ For safety reasons, this appliance may only be used when it has been fully installed.
Warning and Safety instructions ~ The manufacturer's warranty will be invalidated if the appliance is not repaired by a Miele approved service technician. ~ Faulty components must only be replaced by genuine Miele spare parts. The manufacturer can only guarantee the safety of the appliance when Miele replacement parts are used. Correct use ~ The appliance is designed for use within a certain climate range (ambient temperatures), and should not be used outside this range.
Warning and Safety instructions ~ Do not operate any electrical equipment (e.g. an electric ice cream maker) inside the appliance. Danger of sparking and explosion! ~ Do not store cans or bottles containing carbonated drinks or liquids which could freeze in the freezer. The cans or bottles could explode. Danger of injury and damage to the appliance.
Warning and Safety instructions ~ Food stored for too long may present a risk of food poisoning. Storage times will depend on several factors, including the freshness and quality of the food, as well as the temperature at which it is stored. Follow the instructions given on the food manufacturer's packaging regarding storage conditions and "use by" dates. ~ Use only genuine original Miele spare parts.
Warning and Safety instructions ~ Rinse the ice cube maker and the water pipes: – before using for the first time, – if the ice cube maker hasn't been used for a long time, – regularly if the ice cube maker is constantly on (at least once a month) to remove ice residues and prevent the water pipes from becoming blocked, and – before switching off the ice cube maker for a long period of time. Transporting the appliance ~ To avoid damage to the appliance, always transport it upright and in its packaging.
How to save energy Installation/ Maintenance Normal energy consumption Increased energy consumption In a ventilated room. In an enclosed, unventilated room. Protected from direct sunlight. In direct sunlight. Not situated near a heat source (radiator, oven). Situated near a heat source (radiator, oven). Where the ideal ambient Where there is a high room room temperature is approx. temperature. 20 °C. Where the cross-section of the air inlet and outlet is not covered and kept free of dust.
How to save energy Normal energy consumption Use Do not change the arrangement of the drawers and shelves as when delivered. Only open the door when necessary and for as short a time as possible. Store food in an organised way. Frequent opening of the door for long periods will cause a loss of coldness. The appliance will try to cool down and the running time of the compressor will increase. Take a cooler bag when shopping and load food in the appliance as quickly as possible on your return home.
Switching the appliance on and off Before using for the first time Packaging material ^ Remove all packaging material from the inside of the appliance. Protective foil Accessories – Bottle holder The fins of the bottle holder jut out into the bottle shelf and make bottles more secure when opening and closing the appliance door. The stainless steel trims and stainless steel panels have a layer of protective foil to prevent scratching during transportation.
Switching the appliance on and off Operating the appliance A light touch of the finger on the sensors is all that is required to operate this appliance. Each touch of a sensor is confirmed with a keypad tone. The keypad tone can be switched off if you wish (see "Further settings"). Switching on The mains connection symbol t appears in the display when the appliance is plugged in and switched on at the wall socket. ^ Touch the On/Off sensor.
Switching the appliance on and off Individual settings can be set for each cooling zone. Switching off ^ Touch the On/Off sensor. If this is not possible, the safety lock is active. ^ Touch the sensor for the zone in which you want to adjust the settings. The selected sensor lights up yellow. The SuperCool function can be selected or the temperature can be adjusted for the refrigerator section. The SuperFreeze function can be selected or the temperature can be adjusted for the freezer section.
Switching the appliance on and off Switching the refrigerator section back on again Switching off for longer periods of time The refrigerator section can be switched on separately. If the appliance is not going to be used for a longer period of time, e.g. whilst on holiday: ^ switch the appliance off, ^ Touch the sensor for the refrigerator section until it lights up yellow again. The temperature display for the refrigerator section lights up.
The correct temperature It is very important to set the correct temperature for storing food in the appliance. Micro-organisms will cause food which is not stored at the correct temperature to deteriorate rapidly. Temperature influences the growth rate of these micro-organisms. Reducing the temperature reduces their growth rate.
The correct temperature Temperature display In normal operation the temperature display shows the current mean refrigerator section temperature and the temperature in the warmest part of the freezer section. Setting the temperature in the refrigerator/freezer section The temperatures for the refrigerator section and the freezer section are set separately. Dashes are displayed if the temperature in the freezer section is not within the displayable range.
The correct temperature When you tap the buttons, you will see the following changes in the display: – When first tapped: The last temperature selected flashes. – Each subsequent touch of a sensor: The temperature is adjusted in 1 °C steps. Temperature range The temperature can be adjusted: – in the refrigerator section from 3 °C to 9 °C – in the freezer section from -15° C to 26° C. – Leaving a finger on the sensor: The temperature changes continuously.
The correct temperature Adjusting the temperature in the PerfectFresh Pro zone In the PerfectFresh Pro zone the temperature is maintained between 0 and 3 °C. However, if you would like it to be warmer or colder, e.g. when storing fish, you can adjust the temperature slightly. The preset temperature in the PerfectFresh Pro zone is 5. If a setting of between 1 and 4 is selected, minus temperatures may be reached, thus resulting in food freezing.
Using SuperCool and SuperFreeze SuperCool Switching off SuperCool The SuperCool function can be used to rapidly reduce the temperature in the refrigerator section to its lowest setting (depending on the room temperature). The SuperCool function switches off automatically after approx. 12 hours. The refrigerator section then operates with normal cooling performance. Switching on SuperCool SuperCool is particularly recommended for the fast chilling of large amounts of fresh food or drink.
Using SuperCool and SuperFreeze SuperFreeze Switching on SuperFreeze Switch the SuperFreeze function on before putting fresh food into the freezer. When freezing small quantities of food in the freezer, the SuperFreeze function should be switched on 6 hours beforehand. When freezing the maximum load of food, the SuperFreeze function should be switched on 24 hours beforehand. This helps food to freeze quickly and retain its nutrients, vitamins, flavours and appearance.
Using SuperCool and SuperFreeze Switching off SuperFreeze The SuperFreeze function switches off automatically after approx. 30 - 65 hours. The duration until the SuperFreeze function is switched off depends on the amount of fresh food which has been placed in the freezer section. The SuperFreeze ª symbol goes out and the freezer section operates with normal cooling performance. ^ Touch the SuperFreeze sensor so that it is no longer highlighted in yellow.
Temperature and door alarm Your appliance has been fitted with a warning system which ensures that the temperature in the freezer section cannot rise unnoticed and to avoid energy being wasted if a door is left open. Temperature alarm If the freezer section temperature becomes too warm, the temperature for the freezer section flashes and the alarm symbol ; in the display will flash simultaneously. An alarm will also sound.
Temperature and door alarm Door alarm Switching the alarm off early An alarm will sound if a door is left open for too long. The alarm symbol ; will light up. If the noise of the alarm disturbs you, you can switch the alarm off early if you wish. The time until the door alarm is triggered depends on the selected setting and can be either 2 minutes (factory default) or 4 minutes. The door alarm can also be switched off (see "Further settings - Audible tones").
Further settings Certain settings on the appliance can only be selected in the settings mode. While you are in settings mode, the door alarm and any other fault messages are suppressed, but the alarm symbol ; lights up in the display.
Further settings Audible tones ) ^ By touching either the X or Y sensor you can now set whether the safety lock is to be switched on or off: 0: safety lock is switched off 1: safety lock is switched on ^ Touch the OK sensor to confirm your selection. The appliance features audible tones such as a keypad tone and warning tone for the door and temperature alarm. The keypad tone and door alarm warning tone can be switched on or off, but the temperature alarm cannot be switched off.
Further settings Display brightness s You can adjust the display brightness to suit the light conditions in the room. ^ By touching the X or Y sensor you can now select: 0: keypad tone off; door alarm off 1: keypad tone off; door alarm on (after 4 minutes) 2: keypad tone off; door alarm on (after 2 minutes) 3: keypad tone on; door alarm on (after 2 minutes) The display brightness can be adjusted in steps from 1 to 3. The factory default setting is 3 (maximum brightness).
Further settings Sabbath mode ¬ ^ By touching the X or Y sensor you can adjust the display brightness: 1: minimum brightness 2: medium brightness 3: maximum brightness The appliance offers a Sabbath programme for the purposes of religious observance. The following are switched off: – the interior lighting when the door is opened – all acoustic and optical signals – the temperature display ^ Touch the OK sensor to confirm your selection. The selected setting is saved and the s symbol flashes.
Further settings Switching on Sabbath mode ^ Touch the settings sensor. All selectable symbols appear in the display and the 0 flashes. ^ Touch the sensors for setting the temperature (X or Y) repeatedly until the ¬ symbol appears in the display. ^ Touch the OK sensor to confirm your selection. The last selected setting flashes in the display and the ¬ symbol lights up. ^ By touching the X or Y sensor you can now switch on the Sabbath mode. To do this, select the 1 setting.
Using the refrigerator efficiently Different storage zones Due to the natural circulation of the air in the appliance, there are different temperature zones in the refrigerator section. Cold, heavy air sinks to the lowest section of the appliance. Make use of the different zones when placing food in the appliance. This appliance has automatic DynamicCooling, which helps to keep an even temperature when the fan is running.
Using the refrigerator efficiently Food which should not be stored in a refrigerator What to be aware of when shopping for food Not all food is suitable for refrigeration at temperatures below 5 °C because it is sensitive to cold. Depending on the type of food, the appearance, consistency, flavour and/ or vitamin content may be altered if stored at too cold a temperature.
Storing food in the PerfectFresh Pro zone Due to the optimum storage conditions in the PerfectFresh Pro zone for fruit, vegetables, fish, meat and dairy products, food remains fresh for longer, and flavour and vitamins are retained. The optimum storage temperature for fresh food which is not sensitive to the cold is 0-3 °C. This is the temperature range which is automatically maintained in the PerfectFresh Pro zone.
Storing food in the PerfectFresh Pro zone Dry compartment , The dry compartment is suitable for storing perishable foods such as: – Fresh fish, shellfish and crustaceans; – Meat, poultry, sausages; – Deli salads; – Dairy products such as yoghurt, cheese, cream, quark etc.; – Any type of food can in fact be stored in this compartment, as long as it is packaged. The low temperature in the dry compartment is its most distinctive feature. The humidity level is similar to that in a conventional refrigerator.
Storing food in the PerfectFresh Pro zone If the humidity level in the humidity controlled compartment is high, condensate may collect on the floor of the compartment or underneath the lid. This can be removed with a cloth. Regulating the humidity level in the humidity controlled compartment Use the slide control to regulate the humidity level in this compartment to ,, ,, or ,,,. ^ Push the slide control all the way to the back and then slowly release it.
Storing food in the PerfectFresh Pro zone If you are not satisfied with the results of your stored food (e.g. food loses firmness and wilts shortly after placing in the appliance), keep in mind the following instructions: ^ Only place fresh food in the appliance as the initial condition of the food is crucial to maintaining freshness. ^ Clean the PerfectFresh Pro compartments before storing food in them. ^ Dry the surface of very moist food before placing it in the PerfectFresh Pro zones.
Adjusting the interior fittings Adjusting the door shelf / bottle shelf Adjustable shelf / Adjustable shelf with lighting ^ Lift up the bottle shelf / door shelf and pull it towards you to remove it. The LED lighting is located on the stainless steel trim of the adjustable shelf. By adjusting the position of the shelf in the refrigerator section, you can change the illumination in this section according to your needs. ^ Replace the shelf at the required height.
Adjusting the interior fittings The raised edge at the back must face upwards to prevent food from touching the back of the appliance and freezing to it. Stops prevent the shelves from being pulled out accidentally. Adjusting the bottle rack PerfectFresh Pro zone compartments The compartments in the PerfectFresh Pro zone are on telescopic rails, and can be removed for filling, emptying or cleaning purposes. To make it easier to pull out the drawers, remove the bottle shelf from the appliance door.
Adjusting the interior fittings Be careful not to wash out the special lubricant in the telescopic runners when cleaning the appliance. Clean the telescopic runners with a damp cloth. ^ To refit the drawer, insert the compartment lid from beneath into the holders, and push it back into place. To replace the drawer: ^ Place the drawer on the fully extended telescopic runners. ^ Push the drawer in until it clicks into place.
Freezing and storing food Freezing fresh food Storing frozen food Fresh food should be frozen as quickly as possible. This way the nutritional value of the food, its vitamin content, appearance and taste are not impaired. When buying frozen food to store in your freezer section, check Food which takes a long time to freeze will lose more water from its cells, which then shrink. During the defrosting process, only some of this water is reabsorbed by the cells; the rest collects around the food.
Freezing and storing food Home freezing Only freeze fresh food which is in a good condition. Tips on home freezing – The following types of food are suitable for freezing: Fresh meat, poultry, game, fish, vegetables, herbs, fresh fruit, dairy products, pastry, leftovers, egg yolks, egg whites and a range of precooked meals. – The following types of food are not suitable for freezing: Grapes, lettuce, radishes, sour cream, mayonnaise, eggs in their shells, onions, whole raw apples and pears.
Freezing and storing food Before placing food in the freezer ^ When freezing more than 2 kg of fresh food, switch on the SuperFreeze function for some time before placing the food in the freezer (see "SuperFreeze"). This also helps to prevent food that is already in the freezer from starting to defrost.
Freezing and storing food Defrosting Cooling drinks quickly Frozen food can be defrosted in different ways: When cooling drinks quickly in the freezer, make sure bottles are not left in for more than one hour; otherwise they could burst, causing injury and damage.
Making ice cubes For the automatic ice cube maker to operate it must be connected to the mains water supply. Ice cube maker with integrated ice cube tray The automatic ice cube maker b is located in the a ice cube freezer drawer. As soon as the ice cube maker is switched on, the ® symbol lights up in the display and the indicator light illuminates on the ice cube maker. An ice cube tray c is integrated in the ice cube maker b where ice cubes are produced.
Making ice cubes Switching the ice cube maker on/off ^ Touch the settings sensor. All selectable symbols appear in the display and the 0 flashes. ^ Touch the sensors for setting the temperature (X or Y) repeatedly until the symbol for the ice cube maker ® flashes in the display. ^ Touch the OK sensor to confirm your selection. ^ Use the X and Y sensors to set the ice cube maker: 0: Ice cube maker is switched off 1: Ice cube maker is switched on ^ Touch the OK sensor to confirm your selection.
Making ice cubes If you require a large quantity of ice cubes, ^ replace the full ice cube drawer with the drawer beside it on the right. The ice cube maker will begin to produce ice cubes again as soon as this new drawer has been placed in position and closed properly.
Making ice cubes Switching the ice cube maker on/off with the On/Off button ^ Open the ice cube drawer slightly. ^ Press the On/Off button a on the ice cube maker – until the indicator light comes on. The symbol for the ice cube maker ® will appear in the display. The ice cube maker is now on. – until the indicator light goes out. The symbol for the ice cube maker ® will disappear from the display. The ice cube maker is now off. ^ Close the ice cube drawer.
Automatic defrosting Refrigerator section and PerfectFresh Pro zone The refrigerator section and the PerfectFresh Pro zone defrost automatically. Condensate and frost can build up on the back wall of the refrigerator section and the PerfectFresh Pro zone whilst in use. You do not need to remove this, as it will defrost and evaporate automatically with the warmth generated by the appliance.
Cleaning and care Do not let water get into the electronic unit or the lighting, or on the metal discs (contacts) in the lefthand shelf support. Cleaning water must not get into the drain hole. Do not use a steam cleaning apparatus to clean the appliance. Steam could reach the electrical components and cause a short circuit. The data plate located inside the appliance must not be removed. It contains information which is required in the event of a service call.
Cleaning and care Rinsing the ice cube maker Rinse out the ice cube maker and the water pipes – before using for the first time, – when the ice cube maker has not been used for quite a while, – regularly (at least once a month) if it is constantly being used, to remove any ice residues and therefore avoid an blockages in the water pipes, and – before switching the ice cube maker off for an extended period of time. Ensure the ice cube drawer is empty before selecting "Rinse the ice cube maker".
Cleaning and care ^ Touch the OK sensor to confirm your selection. The selected setting will be saved. The ice cube maker symbol ® will flash in the display and the indicator light will flash on the ice cube maker as long as the ice cube maker is being rinsed. Cleaning the ice cube tray Clean the ice cube maker: – before switching off the ice cube maker for an extended period of time. – regularly to remove any ice and water residues. You will hear the ice cube tray turning to a slanted position.
Cleaning and care ^ Remove and clean the ice cube drawer. ^ Touch the settings sensor. The ice cube tray is not removable and can only be cleaned when in place. All selectable symbols appear in the display and the 0 flashes. ^ Touch the sensors for setting the temperature (X or Y) repeatedly until the symbol for the ice cube maker ® flashes in the display. ^ Touch the OK sensor to confirm your selection.
Cleaning and care Before cleaning the appliance ^ Switch off the appliance. The display goes dark and the cooling is switched off. If this is not the case, the safety lock is on (see "Further settings Switching the safety lock on/off). ^ Disconnect the appliance from the mains. Switch off at the wall and withdraw the plug from the socket, or disconnect the mains fuse or remove the screw-out fuse in countries where this is applicable. ^ Take any food out of the appliance and store it in a cool place.
Cleaning and care Cleaning the door shelf / bottle shelf The stainless steel fascias on the door shelf and bottle shelf are not dishwasher-safe. To remove the stainless steel fascias: ^ Take hold of the plastic edging on the left-hand side of the stainless steel strip. 1. Remove the plastic edging from the adjustable shelf, and 2. Remove the strip at the same time. The opposite side will now also be detached. ^ 3. Remove the protective strip at the back.
Cleaning and care Cleaning the interior and accessories Clean the appliance at least once a month. Remove any soiling immediately - do not allow it to dry on. ^ Clean the interior with lukewarm water and a little washing-up liquid applied with a soft sponge. After cleaning, wipe with a clean, damp cloth and then dry with a soft cloth.
Cleaning and care ^ Remove any soiling on stainless steel strips and fascias with the Miele care product for stainless steel. ^ Always apply this care product after cleaning to protect stainless steel surfaces and prevent resoiling. ^ Leave the doors open to air the appliance for a short while. Door seals Do not use any oils or grease on the door seals as these will cause the seals to deteriorate and become porous over time.
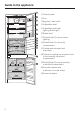
Problem solving guide With the aid of the following guide, minor problems can be easily corrected without contacting Miele. If, after consulting this guide, you cannot remedy the problem, please contact Miele. Please note, however, that a call-out fee will be applied to unnecessary service visits where the problem could have been rectified as described in these operating instructions. To prevent cold from escaping, avoid opening the appliance doors until the fault has been corrected.
Problem solving guide The compressor runs more and more often and for longer periods of time, the temperature in the appliance drops. Problem Possible cause The temperature in The temperature setting is the appliance is too too low. low. The freezer door is not properly closed. The compressor runs continuously. 66 Remedy ^ Correct the temperature setting. ^ Check whether the freezer door closes properly. A large amount of food is being frozen at once. ^ See "Freezing and storing food".
Problem solving guide Problem Possible cause Remedy The compressor is switching on more frequently and for longer periods. The ventilation gaps in the housing unit have been covered or become too dusty. ^ Do not block the ventilation slits. The doors have been opened too frequently, or a large amount of fresh food has been put in at once for refrigerating or freezing. ^ Only open the doors when necessary and for as short a time as possible. The appliance doors are not closed properly.
Problem solving guide The compressor comes on less and less often and for shorter periods of time. The temperature in the appliance rises. Problem Possible cause Remedy The temperature in the appliance is too high. This is not a fault. ^ Correct the temperature setting. The food begins to thaw. ^ See "Installation advice Is the room temperature Location". lower than the ambient temperature for which the ^ Raise the temperature of appliance is designed? the room.
Problem solving guide Information in the display Problem Possible cause Remedy "F0 to F9" appears in There is a fault. the display. ^ Call Miele. There is a fault. ^ Call Miele. "FE*" appears in the display. The ® symbol The water inlet is not open. flashes and the indicator light on the ice cube maker flashes when the ice cube maker is switched on. ^ Open the water inlet. The is a fault with the ice The ® and ; cube maker. symbols flash. The indicator light on the ice cube maker also flashes.
Problem solving guide Information in the display Problem Possible cause The alarm symbol ; and a refrigerator section sensor are flashing in the display. ^ Remedy the alarm. The The affected refrigerator alarm symbol ; will section is warmer or colder disappear and the sensor than the set temperature for the affected because: refrigerator section will – the appliance door has light up constantly again. been opened frequently. The audible tone will stop.
Problem solving guide Interior lighting Problem Possible cause Remedy The LED lighting on the adjustable shelves does not work. To avoid overheating, the lighting switches itself off automatically after approx. 15 minutes if the door is left open. ^ Close the appliance door. When the door is reopened, the interior lighting will work again. ^ Replace the stainless The LED lighting on the steel strip with LED stainless steel strip is faulty. lighting. It can be ordered from Miele.
Problem solving guide Interior lighting Problem Possible cause The LED lighting on The adjustable shelf is not one of the sitting correctly in the adjustable shelves support ribs. does not work. The LED lighting on the adjustable shelves does not work. Remedy ^ Push in the shelf until it clicks into position.
Problem solving guide Interior lighting Problem Possible cause Remedy The LED lighting for the PerfectFresh Pro zone does not work. To avoid overheating, the lighting switches itself off automatically after approx. 15 minutes if the door is left open. ^ Close the appliance door. If this is not the case, then there is a fault. ^ Call Miele. When the door is reopened, the interior lighting will work again. The LED lighting may only be repaired or changed by a Miele authorised service technician.
Problem solving guide Other problems Problem Possible cause Remedy Food has frozen together. The food packaging was not dry when loaded in the freezer. ^ Use a blunt instrument, e.g. a spoon handle or plastic scraper, to prise it apart carefully. An alarm does not sound although the appliance door has been left open for some time. This is not a fault. The alarm None. tone was switched off in settings mode (see "Further settings - Audible tones"). You cannot switch the appliance off.
Problem solving guide Problems with the ice cube maker Problem Possible cause You cannot switch The appliance is not the ice cube maker connected to the power on. supply or is not switched on. Remedy ^ Reconnect the appliance to the electricity supply and switch it on. ^ Switch the appliance and The ice cube maker The appliance or the ice the ice cube maker on. is not producing cube maker is not switched on. any ice cubes. The water inlet is not open. ^ Open the water inlet.
Problem solving guide Problems with the ice cube maker Problem Possible cause Remedy ^ Rinse the ice cube maker The ice cubes taste The ice cube maker has and water pipes regularly or smell odd. been on for a long time and (see "Cleaning and care needs to be cleaned Rinsing the ice cube regularly. maker"). ^ Empty the ice cube The ice cube maker is drawer if you are not seldom used. If you do not going to use the ice cube use it very often, ice cubes maker for a long time.
Noises Normal noises What causes them Brrrrr ... A humming noise is made by the motor (compressor). This noise can get louder for brief periods when the motor switches on. Blubb, blubb ... A gurgling noise can be heard when coolant is circulating through the pipes. Click ... Clicking sounds are made when the thermostat switches the motor on and off. Sssrrrrr ... On multi-zone and frost-free appliances you can sometimes just hear the movement of the fan inside the appliance.
After Sales / Warranty In the event of a fault which you cannot correct yourself, please contact Miele. See back cover for contact details. When contacting Miele, please quote the model and serial number of your appliance. This information is given on the data plate inside your appliance. Warranty The manufacturer's warranty for this appliance is 2 years. For more information on the manufacturer's warranty specific to your country, please contact Miele. See back cover for contact details.
Information for Miele Centers and Chartered Agents Demo mode r This appliance can be presented in Miele Centers and retail stores with the help of the "Demo mode". The controls and lighting will work, but the compressor will not operate. ^ Place your finger on the X sensor, and leave it there. Switching on Demo mode ^ Switch the appliance off by touching the On/Off sensor. ^ At the same time, briefly touch the On/Off sensor (without letting go of the X sensor).
Information for Miele Centers and Chartered Agents Switching off Demo mode The r is illuminated in the display. ^ Touch the settings sensor. ^ Touch the X or Y sensor so that 0 appears in the display (Demo mode is inactive). All symbols that can be selected appear in the display and the 0 symbol flashes. ^ Touch OK to confirm your selection. The setting is saved and the r symbol flashes. ^ Touch the sensors for setting the temperature (X or Y) repeatedly until the symbol for the r flashes in the display.
Mains water connection Notes on connecting to the mains water supply Connection to the mains water supply should only be carried out by a qualified and competent person in strict accordance with national and local safety regulations. Disconnect the appliance from the electricity supply before plumbing it in. Before connecting the water hose for the ice cube maker, ensure the mains tap is completely turned off. This appliance has to be installed in accordance with AS/NZS 3500.1 and AS/NZS 3500.2.
Mains water connection Connection to the water inlet Before making plumbing connections, ensure the appliance is disconnected from the mains electricity supply. The stainless steel hose is 1.5 m long. An extension of the stainless steel hose is not permitted. Connection to the mains water supply should incorporate a mains tap with a 3/ 4" thread. Replace the stainless steel hose if it is defective. It must only be replaced by an original Miele hose (available from Miele).
Mains water connection ^ The stainless steel hose should be attached to the solenoid valve at the base of the appliance at the back. ^ Secure the stainless steel hose to the appliance housing with the retaining clip. Ensure that all connections are water tight. ^ Turn on the tap slowly and check the whole water system for leaks. ^ The appliance can then be connected to the electricity supply (see "Electrical connection"). ^ Push the appliance into its final position.
Electrical connection All electrical work should be carried out by a suitably qualified and competent person in strict accordance with current local and national safety regulations. The appliance is supplied with a mains cable and moulded plug ready for connection to an AC single phase 220 – 240 V 50 Hz supply. The fuse rating must be at least 10 A. The voltage and frequency are given on the data plate. Please ensure that these match the household mains supply.
Installation advice This appliance must be built in, otherwise it could tip up. Side-by-side units The KFNS 37692 iDE has two side wall heaters encased in foam and can be built in side-by-side in separate housing units with all refrigeration appliances. Please contact Miele for information on which combinations are suitable for your appliance. Location This appliance should be installed in a dry, well-ventilated room.
Installation advice Ventilation The ventilation gaps given must be adhered to, otherwise the compressor will be activated more frequently and for longer periods. This will result in increased energy consumption and a higher operating temperature for the compressor. This may in turn cause the compressor to be damaged. Air at the back of the appliance gets warm. The appliance housing unit must therefore be constructed to allow sufficient space for ventilation (see "Building-in dimensions").
Installation advice Before installation ^ Before installation, remove the accessories bag containing installation components and accessories from the appliance, and remove the sealing strip from the appliance door. ^ Do not remove the following from the rear of the appliance: ^ Open the appliance door and remove the red transport clips a (depending on model). – The spacers (depending on model). These ensure the gap required between the back of the appliance and the wall is maintained.
Building-in dimensions Before installation, ensure the building-in niche matches the required dimensions. The required ventilation cross-sections must be adhered to in order to ensure the correct functioning of the appliance.
Adjusting the door hinges The door hinges are set at the factory to enable the door to be opened wide. If the opening angle of the door needs to be limited for any reason, the hinge can be adjusted to accommodate this. – However, if the appliance door hits an adjacent wall when opened, for example, the opening angle can be limited to 90°. ^ Place the locking pins supplied for limiting the door opening into the hinges from above. The door opening angle is now limited to 90°.
Changing the door hinging Two people are needed for changing the door hinging. ^ Open both appliance doors. ^ Remove the shelves from the refrigerator section door. This appliance is delivered with righthand door hinging. If you wish to use left-hand hinging, the hinges must be changed: To change the door hinging, you will need the following tools: ^ Lift off the covers a, b, c and d.
Changing the door hinging ^ Slightly loosen the screws e and f on the hinges. ^ Push each of the doors g and h outwards and take them off their hinges. ^ Unscrew the screws e completely. ^ Place the fixing element i on the opposite side and loosely screw in the screws e. ^ Unscrew the screws f completely and loosely screw them in on the opposite side. If you have put locking pins into the hinges to stop the door opening too far: ^ Remove the locking pins from the top of the hinges.
Changing the door hinging Carry out the following steps on both doors. Removing the soft-close mechanism Risk of injury! When removed from the unit, the soft-close mechanism snaps shut. ^ Place the door with the outer side downwards on a stable surface. ^ Unscrew the ball joint l and screw it into the adjacent hole. ^ Now turn over the appliance door so that outer side faces upwards (hinges remain open). Do not close up the hinges. ^ Remove the soft-close mechanism j from the ball joint.
Changing the door hinging Securing the soft-close mechanism ^ Now turn over the appliance door so that the outer side faces downwards. ^ Screw the mounting k onto the hinge and tighten securely. ^ Open out the soft-close mechanism j and hook it onto the ball joint. ^ Hang the appliance doors g and h onto the prefitted screws e and f, and securely tighten the screws e and f. ^ Replace the covers a, b, c and d. ^ Refit the locking pins in the top of the hinges to prevent the doors opening too far.
Installation Due to the size and weight of the appliance, it is essential that installation is carried out by two people. ^ Install the appliance in a stable, solid housing unit, positioned on an even, horizontal floor. ^ Secure the housing unit against tipping. ^ The housing unit must be carefully aligned using a spirit level before installing the appliance. The unit corners must be at right angles, as otherwise the furniture door will not align correctly with the 4 corners of the appliance.
Installation You will require the following installation components – for mounting the appliance doors: All installation components are designated by numbers. Each component's number can also be found in the installation steps on the following pages. – for building into the niche: All fitting instructions given are for a right-hand hinged appliance. If you have converted the appliance to lefthand hinging, you will need to adapt these instructions accordingly.
Installation ^ Push the appliance two-thirds of the way into its niche. When doing this, make sure that the mains cable does not get trapped. Installation tip: Tie a piece of string around the plug to "lengthen" the mains cable. Then grab the other end of the string and pull the mains cable through the housing unit to make it easier to connect the appliance to the electricity supply after installation.
Installation ^ Now screw the adjustable feet l all the way in. ^ Remove the cover f. ^ Loosely screw on the fixing plate g with the screws h at the top left of the appliance. Do not tighten the screws so that the bracket is still able to slide from side to side. ^ Fit the cover i onto the fixing bracket j. ^ Loosely screw on the fixing bracket j with the screws k at the base of the appliance. Do not tighten the screws so that the bracket is still able to slide from side to side.
Installation Installation ^ Push the appliance into the niche until the covers of the fixing brackets touch the front edge of the side walls of the housing unit. ^ Make sure that the covers of the top and bottom fixing brackets lie flush with the front edges of the housing unit side walls. This will create a gap all round of 42 mm to the front edges of the housing unit side walls. On furniture with door fittings (e.g. stubs, seals etc.
Installation Securing the appliance in the niche ^ Push the loose-fitting fixing bracket against the side wall. ^ Press the appliance against the wall on the hinge side. ^ Screw the chipboard screws s through the hinge plates at the top, bottom and then in the middle to secure the appliance to the housing unit. ^ Screw the fixing bracket j to the housing unit side wall with the screw s. Pre-drill the hole in the housing unit if necessary.
Installation To further secure the appliance in the housing unit, slide the support strips supplied in between the floor of the housing unit and the bottom of the appliance: ^ Break off the ends of the brackets and dispose of them. They are no longer needed. ^ Attach the respective covers f and u to the fixing brackets. ^ First attach the key v to one of the support strips w. ^ Slide the support strip into the guide channel as far as it will go.
Installation Fitting the furniture doors The furniture door must be a minimum of 16 mm thick and a maximum of 19 mm thick. The following dimensions for gaps must be adhered to: – The gap between the furniture door and the kitchen unit door above must be at least 3 mm. – The vertical gap between the furniture doors should generally be 3 mm. The exact value is dependent upon the radius of the edge of the furniture door.
Installation Carry out the following steps on both doors. Tip: Push up the fitting aids b with the furniture front until they are the same height as the doors of adjacent kitchen units. ^ The distance between the appliance door and the fixing bracket is set to 8 mm at the factory. Check this distance and adjust if necessary.
Installation ^ Place the furniture door with the outer side downwards on a stable surface. ^ Fit the side cover q to the fixing bracket on the opposite side of the hinge. ^ Turn the furniture door over and attach the handle (if needed). ^ Using a pencil, lightly mark a line down the centre of the inside of the furniture door e. ^ Hang the fixing bracket d with the fitting aids onto the inside of the furniture door. Align the fixing bracket centrally.
Installation ^ Open the appliance door. Adjusting the position of the door ^ Hang the furniture door onto the adjusting bolts h. – Adjustment to the sides (X) ^ Loosely attach the nuts c on the adjusting bolts. – Height adjustment (Y) ^ Close the door and check the distance between the door and neighbouring furniture doors. The distance should be the same. 104 ^ Move the furniture door. ^ Turn the adjusting bolts h using a screwdriver.
Installation ^ Whilst counterholding the adjusting bolts h with a screwdriver, tighten the nuts c on the appliance doors with the ring spanner j. ^ Drill fixing holes l in the furniture doors and screw in the screws m. Make sure the two metal edges are aligned (Symbol II). ^ The cover strip k must be completely hidden in the niche, and must not protrude. ^ Close both doors.
Installation ^ Tighten all screws again. To make sure the appliance is correctly installed: – The doors must close properly. – The doors must not touch the housing unit. – The seals at the top edge of the handle side must fit properly. ^ To double check, place a torch in the appliance and close the doors. Switch the lights off in the room. If you can see any light shining out from the sides, double check the installation. ^ Fit the top cover o, and click it into place.
Miele Australia Pty. Ltd.
KFNS 37692 iDE en - AU, NZ M.-Nr.