
Operating and Installation Instructions
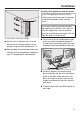
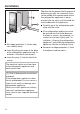
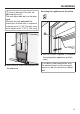
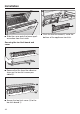
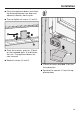
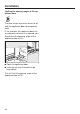
Table Of Contents
- Contents
- IMPORTANT SAFETY INSTRUCTIONS
- Caring for the environment
- Installation
- Installation location
- Installation notes
- Specifications for the plumbed water connection
- Installation dimensions
- Building in the appliance
- Before starting...
- Tools required
- Aligning the installation niche
- Checking the installation niche
- Before installation
- Preparing the installation niche
- Pushing the appliance into the niche
- Aligning the refrigeration appliance
- Securing the appliance in the niche
- Securing the toe-kick board and cover
- Aligning the appliance doors
- Limiting the opening angle of the appliance door
- Water connection
- Electrical connection
- Saving energy
- Guide to the appliance
- Accessories
- Before first use
- Switching on and off
- Selecting additional settings
- Switching / on or off
- Switching on or off
- Performing a
- Switching on the
- Switching off the
- Setting up Miele@home
- Availability of the WiFi connection
- Miele@home availability
- Miele@mobile App
- Connecting your appliance via the Miele@mobile app
- Connecting your refrigeration appliance via WPS
- Deactivating Miele@home
- Activating Miele@home
- Checking the WLAN connection status
- Setting up Miele@home again
- Resetting the network configuration
- Switching off
- Resetting the settings to their default settings
- Switching mode on or off
- Switching on or off
- Switching on, switching off, or resetting the
- Switching on, switching off, or resetting the
- The correct temperature
- Using Automatic SuperCool and SuperFreeze
- Temperature and door alarm
- Adjusting the interior fittings
- Storing food in the refrigerator section
- Storing food in the MasterFresh zone
- Freezing and storing food
- Making ice cubes
- Automatic defrosting
- Cleaning and care
- Water filter
- Frequently Asked Questions
- Causes of noises
- Customer Service
- Declaration of conformity
- Copyrights and licenses

Installation
*INSTALLATION*
34
Adjust the rear feet with a ratchet (at-
tachment: socket, 8mm) or a TX20
screwdriver.
Adjust the front feet with a ratchet (at-
tachment: socket, 8mm) or a TX20
screwdriver.
Tip: Proceed carefully when adjusting
the feet, alternating between the left
and right feet.
Unscrew the adjustable feet and
on both sides at least until the
marking on the toe-kick is aligned
with the required 1 1/4" (32mm) on
the spacer. The standard dimen-
sion of 1 1/4" (32mm) relates to a
niche height of 84" (2,134mm).
It is important to adjust the feet to a
height of at least 1 1/4" (32mm) so
that the ventilation of the refrigeration
appliance via the toe-kick functions
correctly.