
Operating and Installation Instructions
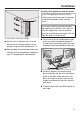
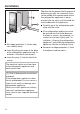
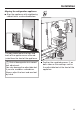
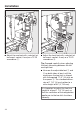
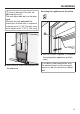
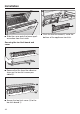
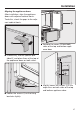
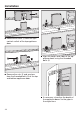
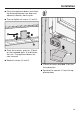
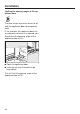
Table Of Contents
- Contents
- IMPORTANT SAFETY INSTRUCTIONS
- Caring for the environment
- Installation
- Installation location
- Installation notes
- Specifications for the plumbed water connection
- Installation dimensions
- Building in the appliance
- Before starting...
- Tools required
- Aligning the installation niche
- Checking the installation niche
- Before installation
- Preparing the installation niche
- Pushing the appliance into the niche
- Aligning the refrigeration appliance
- Securing the appliance in the niche
- Securing the toe-kick board and cover
- Aligning the appliance doors
- Limiting the opening angle of the appliance door
- Water connection
- Electrical connection
- Saving energy
- Guide to the appliance
- Accessories
- Before first use
- Switching on and off
- Selecting additional settings
- Switching / on or off
- Switching on or off
- Performing a
- Switching on the
- Switching off the
- Setting up Miele@home
- Availability of the WiFi connection
- Miele@home availability
- Miele@mobile App
- Connecting your appliance via the Miele@mobile app
- Connecting your refrigeration appliance via WPS
- Deactivating Miele@home
- Activating Miele@home
- Checking the WLAN connection status
- Setting up Miele@home again
- Resetting the network configuration
- Switching off
- Resetting the settings to their default settings
- Switching mode on or off
- Switching on or off
- Switching on, switching off, or resetting the
- Switching on, switching off, or resetting the
- The correct temperature
- Using Automatic SuperCool and SuperFreeze
- Temperature and door alarm
- Adjusting the interior fittings
- Storing food in the refrigerator section
- Storing food in the MasterFresh zone
- Freezing and storing food
- Making ice cubes
- Automatic defrosting
- Cleaning and care
- Water filter
- Frequently Asked Questions
- Causes of noises
- Customer Service
- Declaration of conformity
- Copyrights and licenses

Installation
*INSTALLATION*
32
5
Affix edge protection to the adja-
cent cabinet fronts.
Insert the plug connector at the back
of the refrigeration appliance (see “In-
stallation – Electrical connection”).
Insert the plug into the electrical
socket.
The electrical socket must be close
to the refrigeration appliance and
easily accessible.
Risk of damage due to electrical
overload.
If the refrigeration appliance is elec-
trically overloaded, this can cause a
short circuit and thus damage your
refrigeration appliance.
When you install appliances side by
side, each refrigeration appliance
must have its own separate electrical
socket.
Tip: Secure the power cord to prevent it
becoming caught: tie a piece of string
to the middle of the power cord and as
the refrigeration appliance is being
pushed into the niche, pull the cord for-
ward underneath the appliance.
Carefully push the refrigeration appli-
ance into the niche.
If the refrigeration appliance cannot
be pushed into the niche (because
the floor is uneven, for example), un-
screw the rear feet slightly (see “In-
stallation – Aligning the refrigeration
appliance”) and slide the refrigeration
appliance into the installation niche.
Remove the edge protection from
the adjacent cabinet fronts.