
Operating and Installation Instructions

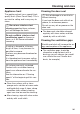
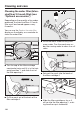
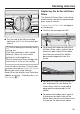

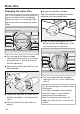
Table Of Contents
- Contents
- IMPORTANT SAFETY INSTRUCTIONS
- Caring for the environment
- Installation
- Installation location
- Installation notes
- Specifications for the plumbed water connection
- Installation dimensions
- Building in the appliance
- Before starting...
- Tools required
- Aligning the installation niche
- Checking the installation niche
- Before installation
- Preparing the installation niche
- Pushing the appliance into the niche
- Aligning the refrigeration appliance
- Securing the appliance in the niche
- Securing the toe-kick board and cover
- Aligning the appliance doors
- Limiting the opening angle of the appliance door
- Water connection
- Electrical connection
- Saving energy
- Guide to the appliance
- Accessories
- Before first use
- Switching on and off
- Selecting additional settings
- Switching / on or off
- Switching on or off
- Performing a
- Switching on the
- Switching off the
- Setting up Miele@home
- Availability of the WiFi connection
- Miele@home availability
- Miele@mobile App
- Connecting your appliance via the Miele@mobile app
- Connecting your refrigeration appliance via WPS
- Deactivating Miele@home
- Activating Miele@home
- Checking the WLAN connection status
- Setting up Miele@home again
- Resetting the network configuration
- Switching off
- Resetting the settings to their default settings
- Switching mode on or off
- Switching on or off
- Switching on, switching off, or resetting the
- Switching on, switching off, or resetting the
- The correct temperature
- Using Automatic SuperCool and SuperFreeze
- Temperature and door alarm
- Adjusting the interior fittings
- Storing food in the refrigerator section
- Storing food in the MasterFresh zone
- Freezing and storing food
- Making ice cubes
- Automatic defrosting
- Cleaning and care
- Water filter
- Frequently Asked Questions
- Causes of noises
- Customer Service
- Declaration of conformity
- Copyrights and licenses

Water filter
110
Changing the water filter
Air in the system can cause water to
gush out and the filter cartridge to
spring out when it is removed. Take
great care when changing the water
filter.
Turn the cap of the filter cartridge
counterclockwise until it is in the hori-
zontal position 1. and slide it out of
the filter opening 2.
Remove the safety cap from the new
filter cartridge.
Loosen the cap from the sides of the
old filter cartridge 3. and remove the
cap 4.
Clip the cap onto the new filter car-
tridge 5.
Empty the old filter cartridge.
Tip: The old filter cartridge can be dis-
posed of with household trash.
6.
Slide the filter cartridge as far as it
will go into the filter opening 6., mak-
ing sure the cap is horizontal.
7.
Turn the cap of the filter cartridge
clockwise until it is in the vertical po-
sition 7.
Risk of damage caused by water
rushing out.
If the filter cartridge is not inserted
correctly, there is a risk of water
leaking out of the appliance.
When inserting the new filter car-
tridge, be sure to turn it as far as the
marker.