
Operating Instructions


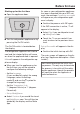
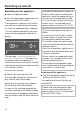

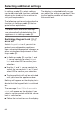
Table Of Contents
- Contents
- IMPORTANT SAFETY INSTRUCTIONS
- Caring for the environment
- Installation
- Installation location
- Installation notes
- Specifications for the plumbed water connection
- Installation dimensions
- Building in the appliance
- Before starting...
- Tools required
- Aligning the installation niche
- Checking the installation niche
- Before installation
- Preparing the installation niche
- Pushing the appliance into the niche
- Aligning the refrigeration appliance
- Securing the appliance in the niche
- Securing the toe-kick board and cover
- Aligning the appliance doors
- Limiting the opening angle of the appliance door
- Water connection
- Electrical connection
- Saving energy
- Guide to the appliance
- Accessories
- Before first use
- Switching on and off
- Selecting additional settings
- The correct temperature
- Using Automatic SuperCool and SuperFreeze
- Temperature and door alarm
- Adjusting the interior fittings
- Storing food in the refrigerator section
- Storing food in the MasterFresh zone
- Freezing and storing food
- Making ice cubes
- Automatic defrosting
- Cleaning and care
- Water filter
- Frequently Asked Questions
- Causes of noises
- Customer Service
- Declaration of conformity
- Copyrights and licenses

Before first use
54
Before first use
Allow the appliance to stand for ap-
prox. 1hour prior to connecting it to
the power supply.
This will help prevent any malfunc-
tions.
Packaging material
Remove all packaging material from
the inside of the appliance.
Leftover tape residue.
Always remove all packaging mate-
rial, including adhesive tape, before
switching on the appliance.
Cleaning
Please refer to the relevant instruc-
tions in “Cleaning and care”.
Clean the inside of the appliance and
the accessories.
Choosing the right Door Assistant
(Push2Open/Pull2Open)
The Door Assistant helps you to open
the appliance door.
You can choose between the two Door
Assistants Push2Open and Pull2Open
(see “Selecting additional settings –
Switching on the Door Assistant ”).
The default Door Assistant is
Push2Open.
Select the
Pull2Open Door Assistant if your appli-
ance has a cabinet front with a han-
dle.
Select the
Push2Open Door Assistant if your ap-
pliance has a handle-free cabinet
front.