
Installation Instructions
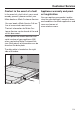
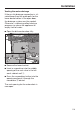

Table Of Contents
- Contents
- IMPORTANT SAFETY INSTRUCTIONS
- Guide to the appliance
- Caring for the environment
- Before using for the first time
- Settings
- Opening the settings menu
- Changing settings
- Closing the settings menu
- Language
- Time
- Water hardness
- AutoDos (AutoDos)
- Rinse aid
- Miele@home
- Remote control
- Remote Update
- SmartStart
- EcoStart
- Temperature
- Display brightness
- Volume
- Memory
- Refill indicators
- AutoOpen
- 2nd interim rinse
- Knock2open
- BrilliantLight
- SaniWash Cycle
- Software version
- Legal Information
- Copyrights and licenses for operator and control software
- Copyrights and licenses for the communication module
- Showroom
- Factory default
- Caring for the environment
- Loading the dishwasher
- Detergents
- Operation
- Options
- Program overview
- Options
- Cleaning and care
- Frequently Asked Questions
- Customer Service
- Optional accessories
- Installation
- Sound emission testing

Installation
*INSTALLATION*
119
Venting the water drainage
If the on-site drainage connection is sit-
uated lower than the guide path for the
lower basket rollers in the open door,
the drainage system must be vented.
Otherwise, a siphoning effect during a
program can cause the appliance to
empty itself of water.
Open the dishwasher door fully.
Remove the lower basket.
Insert a screwdriver into the middle
opening of the vent valve in the left
wash cabinet wall.
Press the screwdriver further into the
opening and push it through the
membrane behind.
The vent opening for the water drain is
now open.