
Installation and Operation


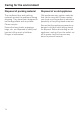


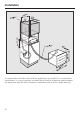
Table Of Contents
- Contents
- IMPORTANT SAFETY INSTRUCTIONS 5
- Guide to the coffee system 10
- Controls and display elements 12
- Accessories 13
- First steps to use 14
- Operation 17
- Filling the water tank 18
- Filling the coffee bean container 19
- Turning the coffee machine on and off 20
- Adjusting the coffee dispensers to the cup height 21
- Preparing beverages 22
- Preparing espresso, coffee or lungo (large) coffee 22
- Preparing double portions 22
- Cancel preparation 23
- Preparing multiple cups of coffee, one directly after another (coffee pot) 23
- Preparing coffee beverages from ground coffee 23
- Beverages with milk 25
- Preparing hot water 26
- Preparing beverages from a profile 26
- After use 26
- Customizing your coffee 27
- Setting the serving size 30
- Settings 36
- Accessing the "Settings" menu 36
- Change and save settings 36
- Overview of possible settings 37
- Language 39
- Time of day 39
- Date 39
- Timer 39
- Eco mode 41
- Lighting 41
- Info (displaying information) 42
- Locking the coffee system ( System lock 0 ) 42
- Water hardness 42
- Display brightness 42
- Volume 42
- Activating and deactivating the plumbed water connection 42
- Factory default settings 43
- Showroom program ( demo mode ) 43
- Descaling 58
- Frequently asked questions 60
- Cleaning clogged milk pipework 69
- After sales service 72
- Installation instructions 73
- Caring for the environment 74
- Plumbing 75
- Lead free certificate 77
- Electrical connection 78
- Installation 79
- Adresses 87

The machine must be connected to
the water supply in accordance with
local and national regulations.
Disconnect the machine from the
electrical supply before connecting
it to the water supply.
Turn off the water supply before
connecting the coffee machine to
the plumbing.
–
All units and systems used to deliver
the water to the coffee system must
conform with the requirements of the
respective country.
– Only connect the machine to the
cold water supply.
– The machine can be connected
without a non-return valve.
– The on-site water line must have a
water shut-off valve to turn the water
off if needed. If not present, have a
water valve installed by a licensed
plumber.
–
The water faucet must be accessible
after installation.
–
Water pressure on-site:
Minimum: 14.5 psi
Maximum: 145 psi, if higher, install a
pressure reduction valve.
–
Suitable 1/4" tubing or copper piping
must be supplied for plumbing.
–
To ensure the best coffee quality, the
maximum length of the tubing or
copper pipe should not exceed 4 ft.
11" (1.5 m). If too much water
remains in the tubing the coffee
quality could be affected.
Make sure that the shut-off valve is
accessible after the unit has been
installed.
Parts must only be replaced with
original Miele spare parts, available
from Miele.
Plumbing
75