
Operating and Installation instructions
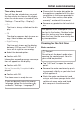
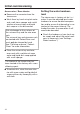

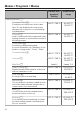
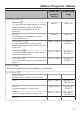
Table Of Contents
- Contents
- IMPORTANT SAFETY INSTRUCTIONS
- Overview
- Control panel
- Description of functions
- Initial commissioning
- Modes / Programs / Menus
- Operation: Steam cooking
- Operation: Combination cooking mode
- Operation: Functions without steam
- Quick guide
- Interrupting operation
- Additional functions
- Setting additional durations
- Turning off automatically
- Turning on and off automatically
- Sequence of an automatic cooking process
- Rapid PreHeat
- Switching off Rapid PreHeat
- Changing the operating mode
- Changing settings during a cooking process
- Changing the temperature
- Changing the core temperature
- Changing the broil level
- Changing the cooking duration
- Deleting a cooking duration
- Deleting a finish time
- Canceling cooking
- MyMiele
- MasterChef
- Favorites
- Alarm + Timer
- General notes
- Steam cooking
- Sous-vide (vacuum) cooking
- Special modes
- Roast probe
- Roast
- Bake
- Broil
- Settings
- Cleaning and care
- Frequently Asked Questions
- Optional accessories
- IMPORTANT SAFETY INSTRUCTIONS - INSTALLATION
- Detailed dimensions of oven front
- Connecting the water intake and drain hoses
- Installation dimensions
- Installation and connection
- Water connection
- Electrical connection
- Caring for the environment
- Technical Service
- MieleCare
- Copyright and licenses

Initial commissioning
31
Time of day format
You will then be asked when you want
the time of day to show on the display
when the steam oven is turned off (see
"Settings - Time of Day - Display"):
– On
The time is always visible on the dis-
play.
– Off
The display appears dark to save en-
ergy. Some modes are limited.
– Night Dimming
The time only shows on the display
between 5:00 am and 11:00 pm. It
turns off at night to save energy.
Select the desired option.
Confirm with OK.
Information regarding energy consump-
tion will appear on the display.
Confirm with OK.
Set-up Successfully Completed is dis-
played.
Confirm with OK.
The steam oven is ready for use.
If you accidentally select the wrong
language, follow the instructions de-
scribed in "Settings - Language ."
Please stick the extra data plate for
the appliance supplied with this doc-
umentation in the space provided in
the "After sales service, data plate,
warranty" section of this manual.
Remove any protective foil and stick-
ers.
The appliance has undergone a func-
tion test in the factory. Residual water
from this testing may have dripped
from the lines into the oven cavity dur-
ing transportation.
Cleaning for the first time
Water container
Danger!
Do not touch the door handle when
opening the control panel. Your fin-
gers could be pinched.
Tap "Lift Panel" to open the control
panel.
Remove the water container by push-
ing upwards slightly as you take it out
of the appliance.
Wash the water container by hand
using a soft clean sponge and a mild
solution of warm water and liquid
dish soap or in the dishwasher.