
Installation and Operation Guide
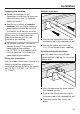


Table Of Contents
- Contents
- Warning and Safety instructions
- Caring for the environment
- Overview
- Cleaning the SmartLine appliance for the first time
- Description of the functions
- Tips on saving energy
- Operation
- Cleaning and care
- Problem solving guide
- Optional accessories
- Service
- Installation
- Safety instructions for installation
- Installation examples
- Surface-mounted
- Installation notes – surface-mounted
- Worktop cut-out – surface-mounted
- Spacer bars – surface-mounted
- Spacer bars for the downdraft extractor – surface-mounted
- Installation dimensions – Surface-mounted
- Air duct dimensions – surface-mounted – worktop depth 600 mm
- Air duct dimensions – surface-mounted – worktop depth greater than 600 mm
- Installation – surface-mounted
- Flush-fit
- Installation notes – flush-fit
- Worktop cut-out – flush-fit
- Spacer bars – flush-fit
- Spacer bars for the downdraft extractor – flush-fit
- Installation dimensions – Flush
- Air duct dimensions – flush-fit – worktop depth 600 mm
- Air duct dimensions – flush-fit – worktop depth greater than 600 mm
- Installation – flush-fit
- Exhaust ducting
- Electrical connection

Installation
*INSTALLATION*
62
Installing the downdraft extractor
The downdraft extractor can be
installed with the connector for the air
duct on either the right or the left-hand
side.
a
Connector for air duct on the right
b
Connector for air duct on the left
Stick the supplied sealing strip under
the edge of the cover. Do not apply
the sealing strip under tension.
Fit the clips onto the spacer bars.
Guide the control cable downwards
between the spacer bars.
Fit the cover onto the spacer bars.
Remove the drip tray from the casing.
Fasten the casing from the inside with
the screws on the right and left
sides (3 in each case).
Fasten the drip tray.
Mount the air duct.
Ensure that the air duct is not under
mechanical tension after installation.