
Installation and Operation Guide
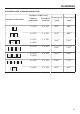


Table Of Contents
- Contents
- Warning and Safety instructions
- Caring for the environment
- Overview
- Cleaning the SmartLine appliance for the first time
- Description of the functions
- Tips on saving energy
- Operation
- Cleaning and care
- Problem solving guide
- Optional accessories
- Service
- Installation
- Safety instructions for installation
- Installation examples
- Surface-mounted
- Installation notes – surface-mounted
- Worktop cut-out – surface-mounted
- Spacer bars – surface-mounted
- Spacer bars for the downdraft extractor – surface-mounted
- Installation dimensions – Surface-mounted
- Air duct dimensions – surface-mounted – worktop depth 600 mm
- Air duct dimensions – surface-mounted – worktop depth greater than 600 mm
- Installation – surface-mounted
- Flush-fit
- Installation notes – flush-fit
- Worktop cut-out – flush-fit
- Spacer bars – flush-fit
- Spacer bars for the downdraft extractor – flush-fit
- Installation dimensions – Flush
- Air duct dimensions – flush-fit – worktop depth 600 mm
- Air duct dimensions – flush-fit – worktop depth greater than 600 mm
- Installation – flush-fit
- Exhaust ducting
- Electrical connection

Installation
*INSTALLATION*
60
Installation – flush-fit
If the worktop is more than 28mm
deep, it must be cut out underneath
on the building-in side on the right or
left-hand side.
a
Worktop
b
Maximum 24mm
c
12 mm
Securing the bracket
1 bracket (supplied with the spacer bar)
must be secured centrally to the right or
left-hand side of the cut-out.
Wooden worktops
Fit the bracket so that it sits flush
with the top edge of the lower step of
the stepped cut-out.
Secure the bracket with the
3.5x25mm wood screws supplied.
Granite and marble worktops
You will need heavy-duty double-
sided tape (not supplied) to secure the
bracket.
Stick the tape onto the upper edge of
the lower step of the stepped cut-out.
Fit the bracket so that it sits flush
with the top edge of the lower step of
the stepped cut-out.
Press the bracket firmly into position.