
Installation and Operation Guide
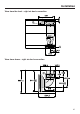
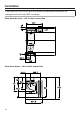


Table Of Contents
- Contents
- Warning and Safety instructions
- Caring for the environment
- Overview
- Cleaning the SmartLine appliance for the first time
- Description of the functions
- Tips on saving energy
- Operation
- Cleaning and care
- Problem solving guide
- Optional accessories
- Service
- Installation
- Safety instructions for installation
- Installation examples
- Surface-mounted
- Installation notes – surface-mounted
- Worktop cut-out – surface-mounted
- Spacer bars – surface-mounted
- Spacer bars for the downdraft extractor – surface-mounted
- Installation dimensions – Surface-mounted
- Air duct dimensions – surface-mounted – worktop depth 600 mm
- Air duct dimensions – surface-mounted – worktop depth greater than 600 mm
- Installation – surface-mounted
- Flush-fit
- Installation notes – flush-fit
- Worktop cut-out – flush-fit
- Spacer bars – flush-fit
- Spacer bars for the downdraft extractor – flush-fit
- Installation dimensions – Flush
- Air duct dimensions – flush-fit – worktop depth 600 mm
- Air duct dimensions – flush-fit – worktop depth greater than 600 mm
- Installation – flush-fit
- Exhaust ducting
- Electrical connection

Installation
*INSTALLATION*
50
Worktop cut-out – flush-fit
B
A
524
500
+
1
+1
ß R 4
B
A
0 2
12
0
10
5,5
+
0,5 *
0 2
B
A
12
0
10
5,5
+
0,5 *
Natural stone worktop Wooden worktop
* 7
+
0.5
mm with CS7611FL
Information for calculating the cut-out
The appliances overlap the stepped cut-out by 10mm.
When installing several appliances, a distance of 2mm must be observed between
the individual appliances.
Calculating cut-out dimensionA
1 appliance = width of the appliance plus 2mm on the right, plus 2mm on the left.
Several appliances = total width of the appliances plus 2mm distance between
the appliances, plus 2mm on the right, plus 2mm on the left
Calculating cut-out dimensionB = cut-out dimension A minus 12mm on the right,
minus 12mm on the left.
Some examples are illustrated below.