
Installation and Operation Guide
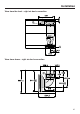
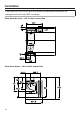


Table Of Contents
- Contents
- Warning and Safety instructions
- Caring for the environment
- Overview
- Cleaning the SmartLine appliance for the first time
- Description of the functions
- Tips on saving energy
- Operation
- Cleaning and care
- Problem solving guide
- Optional accessories
- Service
- Installation
- Safety instructions for installation
- Installation examples
- Surface-mounted
- Installation notes – surface-mounted
- Worktop cut-out – surface-mounted
- Spacer bars – surface-mounted
- Spacer bars for the downdraft extractor – surface-mounted
- Installation dimensions – Surface-mounted
- Air duct dimensions – surface-mounted – worktop depth 600 mm
- Air duct dimensions – surface-mounted – worktop depth greater than 600 mm
- Installation – surface-mounted
- Flush-fit
- Installation notes – flush-fit
- Worktop cut-out – flush-fit
- Spacer bars – flush-fit
- Spacer bars for the downdraft extractor – flush-fit
- Installation dimensions – Flush
- Air duct dimensions – flush-fit – worktop depth 600 mm
- Air duct dimensions – flush-fit – worktop depth greater than 600 mm
- Installation – flush-fit
- Exhaust ducting
- Electrical connection

Installation
*INSTALLATION*
47
Loosen the lug and pull the plug out.
Loosen the strain relief screw and
unlock the casing on both sides.
Open the casing.
Remove the stopper.
Exchange the jumper with the
connection cable of the switching
system.
Close the casing.
Tighten the strain relief screw.
Reinsert the plug.
Connecting the e-box
Connect the fan power cable and fan
control cable to the e-box and the
fan.
Connect the control unit cable to the
e-box.
The socket positions are designed in
such a way that they cannot be mixed
up.
Connect the downdraft extractor to
the mains electricity supply.
Check that the downdraft extractor
works.
Sealing the gaps
Seal the gaps between the individual
SmartLine appliances, and between
the flush-fit SmartLine appliances
and the worktop, with a silicone
sealant that is heat-resistant to at
least 160°C.
Unsuitable sealant can damage
natural stone.
For natural stone worktops and
natural stone tiles, only use silicone
sealant that is specially formulated
for natural stone.
Please follow the manufacturer's
instructions.