
Installation and Operation Guide
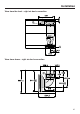
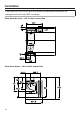


Table Of Contents
- Contents
- Warning and Safety instructions
- Caring for the environment
- Overview
- Cleaning the SmartLine appliance for the first time
- Description of the functions
- Tips on saving energy
- Operation
- Cleaning and care
- Problem solving guide
- Optional accessories
- Service
- Installation
- Safety instructions for installation
- Installation examples
- Surface-mounted
- Installation notes – surface-mounted
- Worktop cut-out – surface-mounted
- Spacer bars – surface-mounted
- Spacer bars for the downdraft extractor – surface-mounted
- Installation dimensions – Surface-mounted
- Air duct dimensions – surface-mounted – worktop depth 600 mm
- Air duct dimensions – surface-mounted – worktop depth greater than 600 mm
- Installation – surface-mounted
- Flush-fit
- Installation notes – flush-fit
- Worktop cut-out – flush-fit
- Spacer bars – flush-fit
- Spacer bars for the downdraft extractor – flush-fit
- Installation dimensions – Flush
- Air duct dimensions – flush-fit – worktop depth 600 mm
- Air duct dimensions – flush-fit – worktop depth greater than 600 mm
- Installation – flush-fit
- Exhaust ducting
- Electrical connection

Installation
*INSTALLATION*
44
Preparing the worktop
Create the worktop cut-out.
Remember to maintain the minimum
safety distances (see "Installation –
Safety distances").
Seal the cut surfaces of wooden
worktops with a suitable sealant to
avoid swelling caused by moisture.
The sealant must be heat-resistant.
Make sure the sealant does not
come into contact with the top
surface of the worktop.
Fitting the spacer bars
Use the middle screw holes if one of the
following SmartLine appliances is
installed to the right or left of the spacer
bar: CS7611, CS 7641, CS7101(-1),
CS7102(-1)
Wooden worktops
Position the spacer bars flush onto
the upper edge of the cut-out.
Secure the spacer bars with the
3.5x25mm wood screws supplied.
Granite and marble worktops
You will need heavy-duty double-
sided tape (not supplied) to secure the
spacer bars.
Stick the tape along the top edge of
the worktop cut-out.
Position the spacer bars flush onto
the upper edge of the cut-out.
Press the spacer bars firmly into
place.