
Installation and Operation Guide


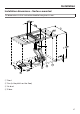


Table Of Contents
- Contents
- Warning and Safety instructions
- Caring for the environment
- Overview
- Cleaning the SmartLine appliance for the first time
- Description of the functions
- Tips on saving energy
- Operation
- Cleaning and care
- Problem solving guide
- Optional accessories
- Service
- Installation
- Safety instructions for installation
- Installation examples
- Surface-mounted
- Installation notes – surface-mounted
- Worktop cut-out – surface-mounted
- Spacer bars – surface-mounted
- Spacer bars for the downdraft extractor – surface-mounted
- Installation dimensions – Surface-mounted
- Air duct dimensions – surface-mounted – worktop depth 600 mm
- Air duct dimensions – surface-mounted – worktop depth greater than 600 mm
- Installation – surface-mounted
- Flush-fit
- Installation notes – flush-fit
- Worktop cut-out – flush-fit
- Spacer bars – flush-fit
- Spacer bars for the downdraft extractor – flush-fit
- Installation dimensions – Flush
- Air duct dimensions – flush-fit – worktop depth 600 mm
- Air duct dimensions – flush-fit – worktop depth greater than 600 mm
- Installation – flush-fit
- Exhaust ducting
- Electrical connection

Installation
*INSTALLATION*
38
Air duct dimensions – surface-mounted – worktop depth
600mm
Side view
a
For maintenance work, it must be possible to remove the rear cabinet wall.
The cabinet wall and an adjoining room wall or a piece of furniture must be at
least 110mm apart to ensure sufficient room for the exhaust ducting.
b
After installation, the removable moisture collection tray must be accessible
from below.
Two quick-release catches have to be opened to remove the tray.
c
Duct length must be adapted to the height of the base unit.
Standard delivery 500mm
d
Plinth fan