
Installation Instructions
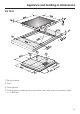
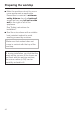
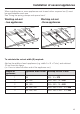
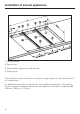
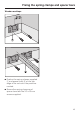

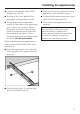
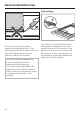
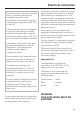
Table Of Contents
- Contents
- Guide to the appliance 4
- Warning and Safety instructions 9
- Caring for the environment 16
- Before using for the first time 17
- Induction 18
- Operation 21
- Tips on saving energy 27
- Safety features 28
- Cleaning and care 30
- Problem solving guide 32
- Optional accessories 34
- Safety instructions for installation 35
- Appliance and building-in dimensions 39
- Preparing the worktop 42
- Installation of several appliances 43
- Fixing the spring clamps and spacer bars 45
- Installing the appliance(s) 47
- General installation tips 48
- Electrical connection 49
- After sales service, data plate 52

^
Make the worktop cut-out for one or
more appliances as applicable.
Remember to maintain a minimum
safety distance from the back wall,
as well as from any tall unit or side
wall to the right or left of the
appliance.
See "Safety instructions for
installation".
^
Seal the cut surfaces with a suitable
heat-resistant sealant to avoid
swelling caused by moisture.
Make sure that sealant does not
come in contact with the top of the
worktop.
If, during installation, you find that the
seals on the corners of the frame are
not flush with the worktop surface,
the corner radius (ß R4) can be
carefully scribed to fit.
Preparing the worktop
42