
Installation Instructions
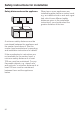
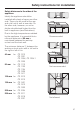
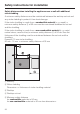
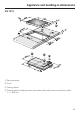
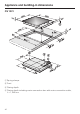
Table Of Contents
- Contents
- Guide to the appliance 4
- Warning and Safety instructions 9
- Caring for the environment 16
- Before using for the first time 17
- Induction 18
- Operation 21
- Tips on saving energy 27
- Safety features 28
- Cleaning and care 30
- Problem solving guide 32
- Optional accessories 34
- Safety instructions for installation 35
- Appliance and building-in dimensions 39
- Preparing the worktop 42
- Installation of several appliances 43
- Fixing the spring clamps and spacer bars 45
- Installing the appliance(s) 47
- General installation tips 48
- Electrical connection 49
- After sales service, data plate 52

Fit the wall units and extractor hood
before fitting the appliance to avoid
damaging the surface.
~
The veneer or laminate coatings of
worktops (or adjacent kitchen units)
must be treated with 100 °C
heat-resistant adhesive which will not
dissolve or distort.
Any backmoulds must be of
heat-resistant material.
~
This appliance may only be used in
mobile installations if a risk assessment
of the installation has been carried out
by a suitably qualified engineer.
~
After installation, ensure that the
connection cable is without hindrance
and that there is no mechanical
obstruction which could damage it,
such as a drawer.
~
If an interim shelf is installed under
the appliance, there must be a
minimum gap of 40 mm between the
top of the shelf and the underside of the
appliance.
~
This appliance must not be installed
over a dishwasher, washing machine,
tumble dryer, refrigerator or freezer.
The high temperatures radiated by
hobs could damage the appliance
below.
~
The minimum safety distances given
on the following pages must be
observed.
All dimensions in this instruction booklet
are given in mm.
Safety instructions for installation
35