
Operating instructions/Installation instructions
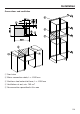
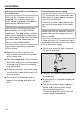


Table Of Contents
- Contents
- Warning and Safety instructions
- Caring for the environment
- Guide to the appliance
- Controls
- Using the appliance
- Description of functions
- Before using for the first time
- Settings
- Settings overview
- Opening the “ Settings ” menu
- Language
- Time
- Date
- Lighting
- Start screen
- Display
- Volume
- Units
- Quick MW
- Popcorn
- Keeping warm function
- Steam reduction
- Recommended temperatures
- Recommended power levels
- Water hardness
- Movement sensor
- Safety
- Furniture front recognition
- Miele@home
- Remote control
- SuperVision
- RemoteUpdate
- Software version
- Legal information
- Showroom programme
- Factory default
- Alarm + minute minder
- Main and sub-menus
- Operation
- Quick MW and Popcorn
- General notes on steam cooking
- Steam cooking
- Sous-vide (vacuum) cooking
- Special applications
- Rapid steam cooking
- Microwave defrosting and reheating
- Automatic programmes
- MyMiele
- User programmes
- Note for test institutes
- Cleaning and care
- Problem solving guide
- Optional accessories
- Service
- Installation
- Conformity declaration
- Copyrights and Licences
- Copyrights and licences for the communication module

Installation
*INSTALLATION*
162
Attaching the stainless steel hose to
the steam oven
Only use the stainless steel hose
supplied. The stainless steel hose
must not be shortened, extended or
replaced by a different hose.
The stainless steel hose must only
be replaced by an original Miele
spare part. The food-grade, stainless
steel hose is available to order from
the Miele online shop, from the Miele
Customer Service Department or
from your local Miele dealer.
The stainless steel hose supplied is
2000mm long.
Remove the cover cap from the
mains water connection at the back
of the steam oven.
Take the angled end of the stainless
steel hose and check whether there is
a sealing ring. If there is no sealing
ring, attach one.
Screw the stainless steel hose coup-
ling onto the thread of the mains wa-
ter connection.
Ensure that the threaded union is
properly connected and does not
leak.
Connecting the water supply
Disconnect the steam oven from
the electrical supply before connect-
ing it to the water line.
Turn off the water supply before con-
necting the steam oven to the water
line.
Make sure that the stopcock remains
accessible after the steam oven has
been installed.
A stopcock with 3/4" thread must be in-
corporated when connecting the steam
oven to the water supply.
Check that a sealing ring is present.
Fit one if necessary.
Connect the stainless steel hose to
the stopcock.
Ensure that it is screwed into position
correctly.
Turn on the water supply stopcock
slowly and check for leaks at the
mains water connection.
Correct the position of the seal and
screw thread if appropriate.