
Operating instructions/Installation instructions

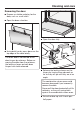
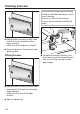
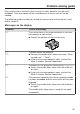
Table Of Contents
- Contents
- Warning and Safety instructions
- Caring for the environment
- Guide to the appliance
- Controls
- Using the appliance
- Description of functions
- Before using for the first time
- Settings
- Settings overview
- Opening the “ Settings ” menu
- Language
- Time
- Date
- Lighting
- Start screen
- Display
- Volume
- Units
- Keeping warm
- Steam reduction
- Recommended temperatures
- Booster
- Automatic rinsing
- Water hardness
- Movement sensor
- Safety
- Furniture front recognition
- Miele@home
- Remote control
- SuperVision
- RemoteUpdate
- Software version
- Legal information
- Showroom programme
- Factory default
- Alarm + minute minder
- Main and sub-menus
- Energy saving tips
- Operation
- General notes
- Steam cooking
- Sous-vide (vacuum) cooking
- Special applications
- Reheat
- Defrost
- Mix & Match
- Containers
- Tips for reheating plated meals
- Tips for cooking plated meals
- Assembling a plated meal using various components
- Notes on the cooking charts
- Using the special application
- Reheating food with the special application
- Cooking food with the special application
- Food suitable for the special application
- Menu cooking – automatic
- Bottling
- Bottling cakes
- Drying
- Extracting juice with steam
- Blanching
- Disinfect items
- Heat crockery
- Keeping warm
- Prove dough
- Heating damp flannels
- Dissolve gelatine
- Decrystallise honey
- Melt chocolate
- Cook bacon
- Sweat onions
- Apple storage
- Making eierstich
- Fruit preserve
- Skinning vegetables and fruit
- Make yoghurt
- Automatic programmes
- MyMiele
- User programmes
- Baking
- Roasting
- Grilling
- Cleaning and care
- Problem solving guide
- Optional accessories
- Service
- Installation
- Note for test institutes
- UK Conformity declaration
- EU Conformity declaration
- Copyrights and licences

Cleaning and care
162
Sequence of a cleaning process
HydroClean takes place in several
phases:
1. Preparation
2. Cleaning phase
3. Wash phase
4. Subsequent manual cleaning
5. Drying phase
You will be guided through the entire
cleaning process by the combination
steam oven. To prepare for the process,
you will be prompted, for example, to
remove accessories from the oven
compartment and to pour the cleaning
agent through the floor filter.
The cleaning phase will begin when all
preparations have been completed. The
door will lock automatically. The clean-
ing agent is mixed with fresh water and
sprayed across the entire oven com-
partment via the distribution wheel on
the ceiling of the oven. This procedure
is repeated multiple times.
The wash phase starts when the time
left is approx. 1hour 20minutes. Any
remaining dirt or cleaning agent
residues are rinsed from the oven com-
partment.
The last phase is the drying phase. This
begins when the time left is approx.
30minutes. To remove coarser residual
soiling, the oven compartment must be
wiped out with a damp cloth before
starting the drying phase.
The cleaning process is cancelled if
the combination steam oven is
switched off. The combination steam
oven automatically performs the wash
and drying phase once it is switched
back on to remove any cleaning agent
residues. Normal operation is only
possible once this has been com-
pleted (see also “What to do if...”
–“Messages on the display”).
Preparing for and starting the clean-
ing process
Select Maintenance.
Select HydroClean.
Select the level of cleaning required
according to the degree of soiling.
Confirm with OK.
Please wait appears. Preparation for
cleaning is underway. This may take a
few minutes. As soon as the appliance
is ready, you will be prompted to re-
move accessories and the side runners.
Take all accessories out of the oven
compartment.
Take out the side runners along with
the FlexiClip runners (if fitted) (see
“Cleaning the side runners”).
Confirm with OK.
Lower the top heat/grill element (see
“Lowering the top heat/grill element”).
Remove coarse soiling from the oven
compartment and from underneath
the floor filter.
Make sure that dirt does not get into
the drain hose.
Confirm with OK.