
Operating instructions/Installation instructions
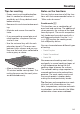
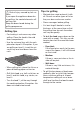
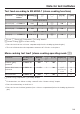
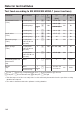
Table Of Contents
- Contents
- Warning and Safety instructions
- Caring for the environment
- Guide to the appliance
- Controls
- Using the appliance
- Description of functions
- Before using for the first time
- Settings
- Minute minder
- Main and sub-menus
- Energy saving tips
- Operation
- General notes
- Steam cooking
- Sous-vide (vacuum) cooking
- Further applications
- Reheat
- Defrost
- Mix & Match
- Menu cooking – automatic
- Blanching
- Bottling
- Bottling cakes
- Drying
- Prove dough
- Disinfect items
- Heat crockery
- Keeping warm
- Heating damp flannels
- Dissolve gelatine
- Decrystallise honey
- Melt chocolate
- Make yoghurt
- Cook bacon
- Sweat onions
- Extracting juice with steam
- Fruit preserve
- Skinning vegetables and fruit
- Apple storage
- Making eierstich
- Automatic programmes
- User programmes
- Baking
- Roasting
- Grilling
- Note for test institutes
- Cleaning and care
- Problem solving guide
- Optional accessories
- Service
- Installation
- Conformity declaration
- Copyrights and licences for the communication module

Grilling
137
Risk of injury caused by hot sur-
faces.
If you open the appliance door dur-
ing grilling, the control elements will
get very hot.
Keep the door closed during the
grilling programme.
Grilling tips
- Pre-heating is not necessary when
grilling. Place the food in the cold
oven compartment.
- Use the universal tray with the rack
placed on top of it. Exception: If you
are grilling on level3, insert the uni-
versal tray one level down from the
rack.
- When grilling fish, place the fish on a
piece of baking paper cut to size.
- Grill thick food, e.g. half a chicken, on
level2 and thin food, e.g. steaks, on
level3.
- Turn the food ²/₃ of the way through
the cooking duration. Exception: fish
does not need to be turned.
Tips for grilling
- Marinate lean meat or brush it with
oil. Do not use other types of fat as
they can burn and cause smoke.
- Pierce sausages before grilling.
- It is best to grill food of a similar
thickness at the same time so that
the grilling time for each item does
not vary too greatly.
- To test the food, press down on the
meat with a spoon. This lets you de-
termine how well the meat has been
cooked.
– Rare/pink
If the meat gives easily to the pres-
sure of the spoon, it will still be red
on the inside.
– Medium
If there is some resistance, the in-
side will be pink.
– Well done
If there is very little resistance, it is
cooked through.
- To grill thicker pieces of food more
gradually after an initial high temper-
ature, continue grilling at a lower
temperature setting or use a lower
shelf level to allow the food to cook
through to the centre.