
Operating instructions/Installation instructions
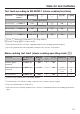
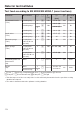
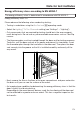
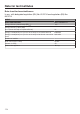
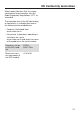
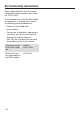


Table Of Contents
- Contents
- Warning and Safety instructions
- Caring for the environment
- Guide to the appliance
- Controls
- Using the appliance
- Description of functions
- Before using for the first time
- Settings
- Minute minder
- Main and sub-menus
- Energy saving tips
- Operation
- General notes
- Steam cooking
- Sous-vide (vacuum) cooking
- Further applications
- Reheat
- Defrost
- Mix & Match
- Containers
- Tips for reheating plated meals
- Tips for cooking plated meals
- Assembling a plated meal using various components
- Notes on the cooking charts
- Using the special application
- Reheating food with the special application
- Cooking food with the special application
- Food suitable for the special application
- Menu cooking – automatic
- Bottling
- Bottling cakes
- Drying
- Extracting juice with steam
- Blanching
- Disinfect items
- Heat crockery
- Keeping warm
- Prove dough
- Heating damp flannels
- Dissolve gelatine
- Decrystallise honey
- Melt chocolate
- Cook bacon
- Sweat onions
- Apple storage
- Making eierstich
- Fruit preserve
- Skinning vegetables and fruit
- Make yoghurt
- Automatic programmes
- User programmes
- Baking
- Roasting
- Grilling
- Cleaning and care
- Problem solving guide
- Optional accessories
- Service
- Installation
- Note for test institutes
- UK Conformity declaration
- EU Conformity declaration
- Copyrights and licences

Note for test institutes
173
Energy efficiency class according to EN60350-1
The energy efficiency class is determined in accordance with EN60350-1.
Energy efficiency class: A+
Please observe the following when conducting testing:
- Testing is undertaken using the Eco Fan heatoperating mode.
- Select the Lighting| “On” for 15 seconds setting (see “Settings” – “Lighting”).
- Only accessories that are required for testing should be in the oven compart-
ment during tests. Do not use any other available accessories such as FlexiClip
runners.
- The thermocouples must be inserted through the door seal for testing purposes.
To do this, pull the door seal out of its groove and pierce it in two places. Insert
the thermocouples through the two holes in the door seal. Then press the door
seal securely into the groove so that it is installed smoothly and evenly all the
way round.
- Next, remove the filter in the floor of the oven compartment and pour water into
the drain until you can see the surface of the water.
- An important pre-condition for determining the energy efficiency class is that the
door is tightly shut during testing.
Depending on the measurement devices used, the functioning of the door seal
can be affected to a greater or lesser extent. This has a negative impact on the
test results.