
Operating instructions/Installation instructions
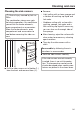
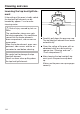
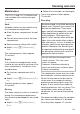
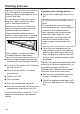
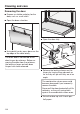
Table Of Contents
- Contents
- Warning and Safety instructions
- Caring for the environment
- Guide to the appliance
- Controls
- Using the appliance
- Description of functions
- Before using for the first time
- Settings
- Minute minder
- Main and sub-menus
- Energy saving tips
- Operation
- General notes
- Steam cooking
- Sous-vide (vacuum) cooking
- Further applications
- Reheat
- Defrost
- Mix & Match
- Containers
- Tips for reheating plated meals
- Tips for cooking plated meals
- Assembling a plated meal using various components
- Notes on the cooking charts
- Using the special application
- Reheating food with the special application
- Cooking food with the special application
- Food suitable for the special application
- Menu cooking – automatic
- Bottling
- Bottling cakes
- Drying
- Extracting juice with steam
- Blanching
- Disinfect items
- Heat crockery
- Keeping warm
- Prove dough
- Heating damp flannels
- Dissolve gelatine
- Decrystallise honey
- Melt chocolate
- Cook bacon
- Sweat onions
- Apple storage
- Making eierstich
- Fruit preserve
- Skinning vegetables and fruit
- Make yoghurt
- Automatic programmes
- User programmes
- Baking
- Roasting
- Grilling
- Cleaning and care
- Problem solving guide
- Optional accessories
- Service
- Installation
- Note for test institutes
- UK Conformity declaration
- EU Conformity declaration
- Copyrights and licences

Cleaning and care
148
Damage due to leaking water.
Leaking water can damage the hous-
ing unit and floor.
If a few drops of water get into the
drip tray, check whether the door
seal is positioned correctly.
If necessary, press it in all the way
round the door to make sure it is in-
stalled smoothly and evenly.
Under extremely adverse circum-
stances, water can collect in the drip
tray up to the height of the plateau:
If this happens, contact the Miele
Customer Service Department.
Raise the top heat/grill element (see
“Lowering the top heat/grill element”).
Install the side runners (see “Cleaning
the side runners”).
Place the accessories in the oven
compartment.
Confirm with OK.
Close the door.
Rinse the condensate container.
Place the condensate container in the
compartment and confirm with OK.
Once the time left has elapsed, Finished
appears on the display and a buzzer
sounds.
Completing the cleaning process
Switch the combination steam oven
off.
Risk of injury caused by hot sur-
faces.
The combination steam oven gets
hot during operation. You could burn
yourself on the heater elements,
oven compartment or accessories.
Allow the heater elements, oven
compartment and accessories to
cool down before removing any
cleaning agent residue and limes-
cale.
Once the oven compartment has
cooled down, remove any cleaning
agent residue from the inside of the
door, the drip tray and the door seal
using a clean, damp microfibre cloth
or sponge.
Tip: You can remove discolouration and
limescale in the oven compartment us-
ing a diluted vinegar solution or
DGClean (see “Optional accessories”).
Wipe with clean water afterwards.
Dry the oven compartment and the
inside of the door with a cloth.
Leave the appliance door open until
the oven compartment is completely
dry.