
Operating instructions/Installation instructions
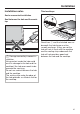
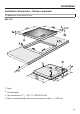

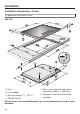
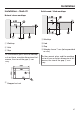
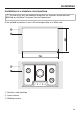
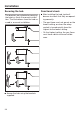
Table Of Contents
- Contents
- Warning and Safety instructions
- Caring for the environment
- Guide to the appliance
- Before using for the first time
- Pans
- Tips on saving energy
- Operation
- Safety features
- Cleaning and care
- Problem solving guide
- Optional accessories
- After sales service
- Installation
- Safety instructions for installation
- Safety distances
- Installation notes
- Installation dimensions – Surface-mounted
- Installation – surface-mounted
- Installation dimensions – Flush
- Installation – flush-fit
- Installation in a stainless steel worktop
- Securing the hob
- Functional check
- Gas connection
- Burner ratings
- Electrical connection
- Converting to another gas type
- Product data sheets

Installation
*INSTALLATION*
47
Installation – flush-fit
Natural stone worktops
a
Worktop
b
Hob
c
Gap
As the ceramic glass and the worktop
cut-out have a certain dimensional tol-
erance, the size of the gap can
vary.
e
Stepped cut-out
Solid wood / tiled worktops
a
Worktop
b
Hob
c
Gap
d
Wooden frame 7 mm (to be provided
on site)
As the ceramic glass and the worktop
cut-out have a certain dimensional tol-
erance, the size of the gap can
vary.