
Operating instructions/Installation instructions
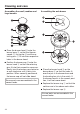


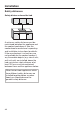
Table Of Contents
- Contents
- Warning and Safety instructions
- Caring for the environment
- Guide to the appliance
- Before using for the first time
- Pans
- Tips on saving energy
- Operation
- Safety features
- Cleaning and care
- Problem solving guide
- Optional accessories
- After sales service
- Installation
- Converting to another gas type
- Product data sheets

Cleaning and care
34
Assembling the small, medium and
large burners
Place the burner head onto the
burner base so that the thermo-
couple, the ignitor and the re-
taining pins fit into their respective
holes in the burner head.
Position the burner cap onto the
burner head so that the retaining
pins fit into their respective recesses.
Gently twist the burner cap clockwise
or anti-clockwise until it locks into
position. When correctly positioned,
the burner cap will not slide about.
Ensure parts are reassembled in the
correct order.
Assembling the wok burner
Place the burner head on the
burner base so that the holes fit
over the jets in the burner base and
the locating bar sits in the notch. If
the burner head is in the correct posi-
tion, it will not move about.
Replace the burner ring so that the
notches are in line above each other.
Replace the burner cap.
Ensure parts are reassembled in the
correct order.