
Operating instructions/Installation instructions

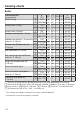
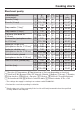
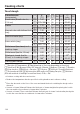
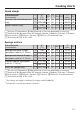
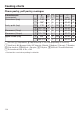
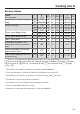
Table Of Contents
- Contents
- Warning and safety instructions
- Caring for the environment
- Guide to the appliance
- Controls
- Using the appliance
- Features
- Before using for the first time
- Settings
- Alarm + minute minder
- M Chef
- Main and sub-menus
- Suitable cookware for M Chef functions
- Energy saving tips
- Operation
- Functions using moisture
- Automatic programmes
- Special applications
- User programmes
- MyMiele
- Baking
- Roasting
- Grilling
- Cleaning and care
- Problem solving guide
- Service
- Installation
- Cooking charts
- Gourmet Assistant overview
- Overview of Automatic programmes
- Conformity declaration
- Copyright and licences

Installation
*INSTALLATION*
111
Installing the Dialog oven
For safety reasons, the Dialog oven
may only be used when it has been
fully installed.
The Dialog oven requires a sufficient
supply of cool air for efficient
operation. The required supply of
cool air must not be excessively
heated by other heat sources (e.g.
solid fuel stoves).
The following must be observed
when installing the appliance:
Do not fit a back panel in the housing
unit.
Ensure that the interim shelf that the
Dialog oven sits on does not abut the
wall.
Do not fit heat insulation strips to the
side panels of the housing unit.
Before starting installation work,
ensure that there is no power to the
socket.
Connect the Dialog oven to the
electrical supply.
Lifting the Dialog oven by the door
handle could cause damage to the
door.
Use the handles on the side of the
casing to lift the appliance.
Push the Dialog oven into the housing
unit and align it.
Open the door.
Pull the water intake pipe forwards
(located below the control panel on
the left).
Secure the Dialog oven to the side
panels of the housing unit using the
screws supplied.