Operating and installation instructions Dialog oven To avoid the risk of accidents or damage to the appliance it is essential to read these instructions before it is installed and used for the first time. en-GB M.-Nr.
Contents Warning and safety instructions ...................................................................... 6 Caring for the environment .............................................................................. 18 Guide to the appliance ...................................................................................... 19 Controls.............................................................................................................. On/Off sensor control..................................
Contents Start screen ......................................................................................................... Brightness ........................................................................................................... Colour scheme .................................................................................................... Volume................................................................................................................. Units ........................
Contents Operation............................................................................................................ Changing values and settings for a cooking programme.................................... Changing the temperature and core temperature .......................................... Changing the number of Gourmet units......................................................... Changing the intensity....................................................................................
Contents Grilling ................................................................................................................ Tips for grilling..................................................................................................... Notes on the cooking charts ............................................................................... Notes on the functions ........................................................................................ 89 89 90 91 Cleaning and care ..........
Warning and safety instructions This Dialog oven complies with all current local and national safety requirements. Inappropriate use can, however, lead to personal injury and material damage. Read the operating and installation instructions carefully before using the Dialog oven. They contain important information on safety, installation, use and maintenance. This prevents both personal injury and damage to the Dialog oven.
Warning and safety instructions The oven compartment is equipped with special lamps to cope with particular conditions (e.g. temperature, moisture, chemical resistance, abrasion resistance and vibration). These special lamps must only be used for the purpose for which they are intended. They are not suitable for room lighting. Replacement lamps may only be fitted by a Miele authorised technician or by the Miele Customer Service Department.
Warning and safety instructions Risk of injury caused by hot surfaces. Children’s skin is far more sensitive to high temperatures than that of adults. The Dialog oven gets much hotter during pyrolytic cleaning than during normal use. Do not let children touch the Dialog oven during Pyrolytic cleaning. Risk of injury from the open door. The oven door can support a maximum weight of 15 kg. Children could injure themselves on an open door.
Warning and safety instructions Operating a damaged Dialog oven can result in electro-magnetic leakage and present a hazard to the user as well as affecting the functionality of electronic devices such as mobile phones. Do not use the Dialog oven if: - The door is warped. The door hinges are loose. The door seals are damaged. Holes or cracks are visible in the casing, the door or the oven compartment walls.
Warning and safety instructions While the Dialog oven is under warranty, repairs should only be undertaken by a Miele authorised service technician. Otherwise the warranty is invalidated. Miele can only guarantee the safety of the oven when original Miele spare parts are used. Faulty components must only be replaced by original spare parts. There are 2 seals around the door. These seals must never be removed.
Warning and safety instructions Correct use Risk of injury caused by hot surfaces. The Dialog oven gets hot when it is being used. You could burn yourself on the heater elements, oven compartment, accessories or food. Use oven gloves when placing hot food in the appliance or removing it and when working in the hot oven compartment. Due to the high temperatures radiated, objects left near the Dialog oven when it is switched on could start to burn. Do not use the Dialog oven to heat up the room.
Warning and safety instructions Food which is stored in the oven compartment or left in it to be kept warm can dry out and the moisture released can lead to corrosion damage in the Dialog oven. Always cover food that is left in the oven to keep warm. An accumulation of heat can cause the enamel on the floor of the oven to crack or flake off. Never line the floor of the oven compartment with aluminium foil or oven liners.
Warning and safety instructions Risk of injury caused by hot food. When heating food up, the heat is created directly in the food itself. For this reason the crockery will remain cooler than the food (except when using oven-proof stoneware). The crockery is only warmed by the heat of the food. Before serving, always check the temperature of the actual food itself after taking it out of the oven. The temperature of the container is not an indication of the temperature of the food or liquid in it.
Warning and safety instructions If you cook eggs without their shells, the yolks could explode due to the resulting pressure. Prick the yolk several times before cooking to avoid this. Eggs heated in their shells can burst, even after they have been taken out of the oven. Eggs can only be cooked in their shells in a specially designed eggboiling device. Do not reheat hard boiled eggs using M Chef functions.
Warning and safety instructions Unsuitable crockery can suffer damage and cause damage to the Dialog oven. Do not use any closed metal containers, aluminium foil, cutlery, metal-plated crockery, lead crystal glassware, temperature-sensitive plastics, metal clips or plastic or paper covered wire ties. (see “Suitable cookware for M Chef functions”). Do not leave the Dialog oven unattended when heating or cooking food in containers made of wood or other inflammable materials.
Warning and safety instructions The following applies to stainless steel surfaces: Adhesives will damage the stainless steel surface and cause it to lose its dirt-repellent protective coating. Do not use sticky notes, adhesive tape or other types of adhesive on the stainless steel surface. Magnets can cause scratches. Do not use the stainless steel surface as a magnetic notice board. Cleaning and care Risk of injury due to electric shock.
Warning and safety instructions Accessories Only use original Miele accessories. If other parts are used, warranty, performance and product liability claims will be invalidated. Miele will guarantee to supply functional spare parts for a minimum of 10 years and up to 15 years following the discontinuation of your Dialog oven. The Miele Gourmet oven dish HUB 62-22 (if available) must not be inserted into shelf level 1. This will damage the floor of the oven.
Caring for the environment Disposing of the packaging material Disposing of your old appliance The packaging material is used for handling and protects the appliance from transport damage. The packaging material used is selected from materials which are environmentally friendly for disposal and can generally be recycled. Electrical and electronic appliances contain many valuable materials.
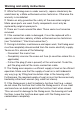
Guide to the appliance Dialog oven a Controls with M Chef logo b Door lock for pyrolytic cleaning c Top heat/grill element with antenna for M Chef functions d Steam inlet openings e Water intake pipe for the steam injection system f Connection socket for the food probe g Temperature sensor h Air inlet for the fan with ring heating element behind it i Side runners with 4 shelf levels j Oven floor with bottom heat element underneath it k Front frame with data plate l Door 19
Controls a Recessed on/off sensor For switching the Dialog oven on and off b Optical interface (For Miele Service only) c sensor control To go back a step d Touch display For displaying information and for operation e sensor control For setting the minute minder or alarms f sensor control For switching the oven interior lighting on and off 20
Controls On/Off sensor control The On/Off sensor control is recessed and reacts to touch. It is used for switching the Dialog oven on and off. As soon as the Dialog oven is switched on, the M Chef logo lights up on the top left-hand side of the control panel. Sensor controls The sensor controls react to touch. Every touch of a sensor control is confirmed with an audible tone. This audible tone can be switched off if required, by selecting Volume | Keypad tone | Off.
Controls Touch display The sensitive surface of the touch display can be scratched by pointed or sharp objects, e.g. pens. Only touch the display with your fingers. Make sure that water cannot get behind the touch display. The touch display is split into multiple areas. 12:00 M Chef Oven functions Automatic programmes Special applications The menu path appears on the left of the header. The individual menu options are separated by a vertical line.
Controls Symbols The following symbols may appear in the display: Symbol … Meaning This symbol indicates that there is additional information and advice about using the appliance. Press the OK sensor control to confirm the information. This indicates that there are more options available, which are not visible because there is not enough space in the display. Alarm Minute minder Some settings, e.g. display brightness and buzzer volume are selected using a bar chart.
Using the appliance You operate the Dialog oven via the touch display by touching the desired menu option. Each time you touch a possible option, the relevant characters (word and/or symbol) light up orange. Fields for confirming an operating step are highlighted in green (e.g. OK). Selecting a menu option Touch the field or value you want in the display. Scrolling You can scroll left or right. Swipe across the screen.
Using the appliance Entering numbers using the numerical keypad Touch in the bottom right of the input field. The numerical keypad will appear. Touch the desired numbers. As soon as you enter a valid value, OK turns green. Use the arrow key if you need to delete the last entered number. Confirm with OK. The changed number is now saved. Changing the setting with a segment bar Some settings are represented by a bar with seven segments.
Features Data plate Side runners The data plate is located on the front frame, visible when the door is open. The data plate states the model number, the serial number as well as connection data (voltage, frequency and maximum rated load). Please have this information to hand, should you need to contact Miele regarding any questions or problems. There are side runners on the left and right of the oven compartment with shelves for inserting accessories.
Features Round baking trays If you are using the universal tray with the rack on top, insert the tray between the rails of the side runners and the rack will automatically slide in above them. The surfaces of the baking tray and the universal tray are treated with a PerfectClean enamel. The rack is suitable for Pyrolytic cleaning.
Features Baking stone HBS 70 The baking stone is ideal for items which need a well baked base such as pizza, quiche, bread, bread rolls and savoury snacks. The baking stone is made from heatretaining fireclay and is glazed. A paddle made of untreated wood is supplied with the baking stone for placing food on it and taking it off. Slide the rack in and place the baking stone on it. The baking stone is not suitable for use with M Chef functions. It must only be used with conventional cooking functions.
Features Accessories for cleaning and care PerfectClean treated surfaces - Descaling tablets, plastic tube with suction cup for descaling the Dialog oven PerfectClean surfaces have very good non-stick properties and are exceptionally easy to clean. Food can be easily removed from these surfaces. Soiling from baking and roasting can be easily removed from these surfaces. Food can be sliced or cut up on PerfectClean surfaces.
Before using for the first time Miele@home Your Dialog oven is equipped with an integrated WiFi module. To use this feature, you will need: - A WiFi network - The Miele app - A Miele user account. The user account can be created via the Miele app. The Miele app will guide you as you connect your Dialog oven to your home WiFi network.
Before using for the first time Basic settings Setting the language The following settings must be made before starting up for the first time. You can change these settings again at a later time (see “Settings”). Select the desired language. Risk of injury caused by hot surfaces. The Dialog oven gets hot when it is being used. For safety reasons, the Dialog oven may only be used when it has been fully installed.
Before using for the first time Heating up the Dialog oven for the first time and rinsing the steam injection system Select Automatic burst of steam. When the Dialog oven is heated up for the first time it may give off a slight smell. This can be eliminated by heating the empty Dialog oven for at least an hour. It is a good idea to rinse out the steam injection system at the same time. Fill a suitable container with the required amount of mains water. The prompt to draw in water then appears.
Before using for the first time Remove the water container after the water intake process and close the door. Cleaning the oven compartment after heating it up for the first time The message confirming that the intake process is completed will disappear. surfaces. The Dialog oven gets hot when it is being used. You could burn yourself on the heater elements, oven compartment or accessories. Allow the heater elements, oven compartment and accessories to cool before manual cleaning.
Settings Settings overview Menu option Select language Available settings ... | deutsch | english | ...
Settings Menu option Available settings Cooling fan run-on Time controlled Temperature controlled* Pyrolytic With reminder Without reminder* Recommended temperatures Safety System lock | Off* On Sensor lock Catalyser On | Off* Network On Off* Miele@home Module settings | Start module activity | IP settings | DNS | SSID settings | Network encryption Module status settings System settings | Appliance list | Update appliance | Sign on more appliances | Sign out of system |
Settings Opening the “Settings” menu Set In the Settings menu, you can personalise your Dialog oven by adapting the factory default settings to suit your requirements. Set the hours and the minutes. You are in the main menu. If there is a power cut, the current time of day will reappear once power has been restored. The time of day is saved for approx. 200 hours. Select Settings. Synchronise Select the desired setting.
Settings Start screen Colour scheme The Dialog oven is factory-set for the main menu to appear when it is switched on. You can change this default setting so that, for instance, the oven functions or MyMiele settings appear in the status display straight away (see “MyMiele”). Choose between a light or dark colour scheme for the display. This new status display will then appear when the Dialog oven is next switched on. Select the sensor control or follow the path in the header to get to the main menu.
Settings Units Pyrolytic Weight You can set whether the recommendation for carrying out pyrolytic cleaning will appear (With reminder) or will not appear (Without reminder). For automatic programmes, you can set the weight of food in grams (g), pounds (lb) or pounds/ounces (lb/oz). Temperature You can set the temperature in degrees Celsius (°C) or degrees Fahrenheit (°F).
Settings Sensor lock The sensor lock prevents the cooking programme being switched off by mistake or settings being changed. Apart from the On/Off sensor control, the activated sensor lock prevents the sensor controls and fields in the display from working for a few seconds after a programme has been started. - On The sensor lock is activated. Touch the symbol for at least 6 seconds to deactivate the sensor lock for a short period of time. - Off The sensor lock is deactivated.
Settings – - - DNS Server 2 SSID settings – Enter SSID – Search SSID System settings - Enter the appliance name using the keyboard. You can add a line break for longer appliance names using the symbol. The new appliance name will be used by the communication module and by the Miele@mobile app. Network encryption – Authentication – Network code Select Network status to show the current module settings.
Settings WPS push button As an alternative to networking your Dialog oven via the Miele@mobile app, we recommend using WPS (Wireless Protected Setup). To do so, you will need a WPS-compatible router. Select WPS push button. Please wait will appear in the display. Activate the WPS function on your router within 2 minutes. Once the connection has been made, confirm the message with OK.
Settings Appliance options M Chef All household appliances signed in to the Miele@home System are displayed. Once you have selected an appliance, you can access further settings: The brightness of the M Chef logo can be adjusted on the Dialog oven (see “Settings - Brightness”). - Display this appliance – On Factory default - – Off The SuperVision function for this appliance is switched off. The appliance is still signed in to the Miele@home system.
Alarm + minute minder Using the sensor control, you can set a minute minder, e.g. for boiling eggs, or an alarm for a specific time. Two alarms can be set simultaneously; two minute minder durations or an alarm and a minute minder duration. Using the Alarm function The alarm can be used to specify a particular time for a buzzer to sound. Setting the alarm If QuickTouch | Off has been selected, you will need to switch on the Dialog oven before setting the alarm.
Alarm + minute minder Using the minute minder function The minute minder can be used to time other activities in the kitchen, e.g. boiling eggs. The minute minder can also be used at the same time as a cooking programme for which the cooking duration start and finish times have been set (e.g. as a reminder to stir the food or add seasoning, etc.). The maximum minute minder time that can be set is 9 hours, 59 minutes and 59 seconds.
M Chef number set has been used. The more Gourmet units you set, the more energy the food receives. Principle of operation M Chef technology uses electromagnetic waves to heat the food. The Dialog oven combines two different cooking methods: - M Chef heats the entire body of the food using electromagnetic waves. - You don't set any Gourmet units, just the temperature. Gourmet units are automatically allocated to the food.
M Chef Tip: Recipes for M Chef functions and Automatic programmes can be found in the cookbook for your Dialog oven. With M Chef functions you do not set any Gourmet units, just the temperature. Adapting existing recipes to M Chef functions Check the food at regular intervals. If the food has been cooked to your liking, take a note of the number of Gourmet units required. The M Chef functions offer more settings than with conventional cooking functions.
M Chef Gourmet Profi and Gourmet assistant Go to M Chef in the main menu to find the Gourmet Profi and Gourmet assistant menus. Gourmet Profi If you want to carry out all settings for a cooking programme yourself, you will find the M Chef functions here such as M Chef + Fan plus or M Chef + Auto roast (see “Main menu and sub-menus”). Depending on the type of food, select the relevant function and set the temperature, Gourmet units and intensity yourself (see “Operation”).
Main and sub-menus Menu M Chef Range 180 °C 30–250 °C 200 °C 30–280 °C 180 °C 130–250 °C 190 °C 50–250 °C 180 °C 100–230 °C Gourmet Profi M Chef + Fan plus M Chef + Conventional heat M Chef + Moisture plus M Chef + Auto roast M Chef + Intensive bake M Chef + Full grill 240 °C 200–300 °C M Chef + Fan grill 200 °C 100–260 °C 160 °C 30–250 °C 180 °C 30–280 °C 160 °C 130–250 °C 170 °C 50–250 °C 160 °C 100–230 °C 190 °C 100–280 °C 190 °C 100–250 °C 2
Main and sub-menus Menu Recommen ded value Range Defrost – – Drying 80 °C 50–100 °C Heat crockery 50 °C 50–80 °C Prove dough 35 °C 30–50 °C 100 °C 80–120 °C Conventional heat 180 °C 30–280 °C Bottom heat 190 °C 100–280 °C Special applications Low temp.
Suitable cookware for M Chef functions In order for electro-magnetic waves to reach the food, they must be able to penetrate the crockery being used. Electro-magnetic waves pass through porcelain, glass, card and plastic, but not metal. With this in mind, be sure not to use crockery with metallic decoration or metal lids. Metal reflects electromagnetic waves which can create sparks and the waves are not absorbed by the metal. Fire hazard due to using unsuitable crockery with M Chef functions.
Suitable cookware for M Chef functions - Heat-resistant plastic containers and single-use plastic containers Special plastic containers are available from retail outlets. To protect the environment, we do not recommend the use of single-use containers. Plastic must be heat-resistant to a minimum of 150 °C. Otherwise the plastic may melt and fuse with the food. Only use plastic containers that are heat-resistant (oven-proof).
Energy saving tips Cooking programmes - If possible, use the automatic programmes for cooking food. - Remove all accessories from the oven compartment that are not required for cooking. - In general, if a range of temperatures is given in a recipe or chart, it is best to select the lower temperature and to check the food after the shortest duration. - Preheat the oven only if instructed to do so in the recipe or the cooking chart. - If possible, do not open the door during a cooking programme.
Energy saving tips Residual heat utilisation Settings - In cooking programmes using temperatures greater than 140 °C and with cooking durations longer than 30 minutes, the temperature can be turned down to the lowest possible level about 5 minutes before the end of the cooking programme. The residual heat in the oven is sufficient for cooking the food until it is done. Do not switch the Dialog oven off (see “Warning and safety instructions”).
Operation Switch the Dialog oven on. The main menu will appear. Select the operating mode you want to use (see “Main menu and submenus”). The operating mode will appear in the display. Depending on the operating mode, the recommended values will appear in the display, including the temperature and the Gourmet Units for M Chef operating modes. Change the recommended values for the cooking process if necessary. It is not essential to set a specific number of Gourmet Units for M Chef operating modes.
Operation Changing values and settings for a cooking programme The cooking programme will resume with the new desired temperatures. Depending on the function, as soon as a cooking programme is in progress, you can change the values or settings for this programme.
Operation To increase the degree of cooking (e.g. to well done instead of medium when roasting): Increase the number or Gourmet units. This increases the cooking duration. Changing the intensity The intensity determines how quickly and evenly the food should absorb the energy in the form of Gourmet units. - For most food, e.g. bread, flaky pastry, casseroles, terrines, roast meat and fish.
Operation Setting cooking durations Cooking results can be impaired if there is a long delay between the food being placed in the oven and the start of cooking. Fresh food can change colour and even deteriorate. When baking, the cake mixture or dough can dry out, and the raising agents can lose their effectiveness. Select as short as possible a time until the cooking programme starts.
Operation Changing the set cooking durations Pre-heating the oven Select Change. The Rapid heat-up function is used to quickly pre-heat the oven in some conventional cooking functions. Select Open further settings. Select the desired time and change it. Confirm with OK. These settings will be deleted in the event of a power failure. Deleting the set cooking durations Select Change. Select Open further settings. Set the required duration to -- --. Confirm with OK.
Operation Rapid heat-up The Rapid heat-up function is used to quickly pre-heat the oven. The Rapid heat-up function is switched on as the factory default setting for the following functions: - Fan plus - Auto roast - Conventional heat - Moisture plus If you set a temperature above 100 °C and the Rapid heat-up function is switched on, a rapid heating-up phase heats the oven to the set temperature.
Operation Pre-heat The Pre-heat function is generally switched on in all functions, except when you set a cooking programme to switch on and switch off automatically. In the M Chef functions, Gourmet units are not used during the heating-up phase. As soon as food is placed in the oven, it is heated up and browned by the heater elements from the outside and Gourmet units are added.
Operation Crisp function Change type of heating It is a good idea to use the Crisp function function (moisture reduction) when cooking food which has a moist topping e.g. quiche, pizza, tray bakes with fresh fruit toppings or muffins. This menu option only appears with the M Chef + Moisture plus and Moisture plus functions (see “Functions using moisture – Changing the method of heating”). Poultry in particular gets a nice crisp skin with this function.
Functions using moisture Your Dialog oven is equipped with a steam injection system for cooking with moisture. Baking, roasting and cooking with the M Chef + Moisture plus and Moisture plus functions guarantees optimum steam and air flow for even cooking and browning results. Depending on the function, set the temperature and Gourmet units (if required) and specify the number of bursts of steam.
Functions using moisture Starting a cooking programme using moisture It is normal for condensation to form on the inside of the door during steam injection. This will evaporate during the course of the cooking programme. Prepare the food and place it in the oven. Select the function you want to use (M Chef + Moisture plus or Moisture plus ). The recommended settings will appear in the display. Change the recommended values if necessary. Confirm with OK.
Functions using moisture Preparing and starting the water intake process The message confirming that the intake process is completed will disappear. Fill a suitable container with the required amount of mains water. The sound of the pump running can be heard again briefly. Residual water in the water intake pipe is being drawn into the oven. Open the door. Pull the water intake pipe forwards (located below the control panel on the left). The oven heating and cooling fan will switch on.
Functions using moisture Change type of heating The M Chef + Moisture plus function uses M Chef + Fan plus with the addition of moisture as standard. The Moisture plus function uses Fan plus with the addition of moisture as standard. You can also use moisture with another method of heating instead of Fan plus: - Conventional heat - Intensive bake - Auto roast Select Change. Select Open further settings. Select Change type of heating. Select the method of heating you want.
Functions using moisture Select Start. Evaporate residual moisture The burst of steam will be released. Burst of steam active appears. When cooking using the addition of moisture, the water will be equally distributed between the bursts of steam and used up as long as the programme is not interrupted. Proceed as described to release further bursts of steam as soon as Start Manual burst of steam appears. After the final burst of steam, Burst of steam finished will appear in the display.
Functions using moisture Starting residual water evaporation immediately Risk of injury caused by steam. Steam can cause severe scalding. Do not open the door whilst bursts of steam are being released. Select a function or an automatic programme that uses moisture. The prompt Evaporate residual moisture? will then appear. Select Yes. Evaporate res. moisture and a time then appear in the display. The residual water evaporation will then start. You can follow the time counting down in the display.
Automatic programmes The wide range of automatic programmes enables you to achieve excellent results with ease. Most of the automatic programmes use M Chef technology. Settings such as the number of Gourmet units and the intensity are automatically set in these programmes. Recipes for automatic programmes can be found in the cookbook supplied with your Dialog oven. An overview of applications is given at the end of this document under “Overview of automatic programmes ”.
Automatic programmes Search (Depending on language) Under Automatic programmes, you can search by the name of the categories and the automatic programmes. There is a full text search function which can also be used to search for parts of words. From the main menu: Select Automatic programmes . The category list will appear in the display. Select Search. Use the keyboard to type in the search text, e.g. “Bread”. The number of hits will be shown in the footer.
Special applications This section provides information on the following applications: - Defrost - Drying - Heat crockery - Prove dough - Low temp. cooking - Sabbath programme - Frozen food/ready meals Defrost This programme has been developed for gently defrosting frozen food, such as a whole chicken, minced meat, fish or fruit. Air in the oven compartment is circulated by the fan and the frozen food is gently and rapidly defrosted by electro-magnetic waves.
Special applications Select Special applications . Defrosting a cream filled cake Select Defrost. Frozen cream cakes are a very delicate food that can be quickly and gently defrosted in the Dialog oven. Enter the height of the frozen food, and then confirm with OK. Enter the weight of the frozen food and then confirm with OK. Follow the instructions on the display. The food will now be gently defrosted.
Special applications Drying Dehydrating or drying is a traditional method of preserving fruit, certain vegetables and herbs. It is important that fruit and vegetables are ripe and not bruised before they are dried. Peel and core the food for drying, if necessary, and cut it up. Distribute the food for drying evenly in a single layer according to size over the wire rack or the universal tray. Dry on a maximum of 2 levels at the same time. Place the food for drying on shelf levels 2+3.
Special applications Heat crockery Prove dough If the crockery is pre-heated, the food does not cool down as quickly. This programme is designed specifically for proving yeast dough without the addition of moisture. Use heat-resistant crockery. Place the wire rack on shelf level 2 and place the crockery to be warmed on it. Depending on the size of the crockery, you can also place the rack on the oven floor. Select Special applications . Select Heat crockery.
Special applications Low temp. cooking The Low temp. cooking cooking method is ideal for cooking beef, pork, veal or lamb when a tender result is desired. First sear the meat all over at a high temperature on the hob in order to seal it. Then place the meat in the pre-heated oven compartment where the low temperature and long cooking duration will cook it to perfection and ensure it is very tender. The meat will relax.
Special applications Using the Low temp. cooking special application Observe the information under “Roasting – Food probe”. Select Special applications . Select Low temp. cooking. Follow the instructions on the display. Place the necessary accessories in the oven compartment for the preheating phase. Set the temperature and the core temperature. Whilst the oven is pre-heating, sear the meat thoroughly on all sides on the hob. Danger of burning due to hot surfaces.
Special applications Sabbath programme Select Special applications . The Sabbath programme is for religious observance. Select Sabbath programme. After you have selected the special application, select the operating mode and temperature. The programme sequence will only start after the door is opened and closed: - After approx. 5 minutes, the cooking process will begin using the Conventional heat or Bottom heat operating mode.
Special applications Frozen food/Ready meals Tips for cakes, pizza and baguettes - Bake cakes, pizza and baguettes on baking paper on the rack. Do not use the baking tray or the universal tray for frozen foods with a large surface area. The tray could become warped and difficult, or even impossible, to remove from the oven compartment when hot. Additional use will make the warping worse. - Use the lowest temperature recommended on the packaging.
User programmes You can save up to 20 User programmes: - At the end of an Automatic programme, save it as a User programme. - Save a cooking programme that has settings such as function, temperature, Gourmet units, intensity and duration or core temperature once it has finished. - You can use the Miele@mobile App to transmit programme settings for selected recipes to your Dialog oven and then start the programme. These settings are not saved. If you wish to save the programme, you have to give it a name.
User programmes Starting user programmes Deleting user programmes Place the food in the oven. Select User programmes . Select User programmes . The programme names appear in the display. Select the programme you want to use. You can start the programme immediately or delay the start. - Start now The programme will start immediately. The oven heating will switch on immediately. - Start later This menu option only appears when you are using the food probe.
MyMiele Under MyMiele , you can save frequently used applications. It is particularly useful with automatic programmes as you do not need to work through every menu level in order to start your programme. Tip: You can also set menu options that you have entered in MyMiele as your start screen (see “Settings – Start screen”). Add entry Editing MyMiele After selecting Process, you can add entries (up to a maximum of 20), sort entries (if there are more than 4) or delete entries.
Baking Handling food carefully will help protect your health. Cakes, pizzas and french fries should be cooked until golden, not dark brown. Tips on baking - If you are using M Chef functions, the food is cooked from the inside by electro-magnetic waves and at the same time browned on the outside by the heater elements. Cooking durations are shorter this way than with conventional functions. The set temperature is higher in order to achieve the level of browning required in the shorter time.
Baking Notes on the cooking charts Notes on the functions You can find the cooking charts at the end of this book. You can find an overview of all the functions with their recommended values in “Main and sub-menus”. Selecting the temperature As a general rule, select the lower temperature given in the chart. Baking at temperatures higher than those recommended may reduce the cooking duration, but will lead to uneven browning of the food and unsatisfactory cooking results.
Baking Using M Chef + Moisture plus and Moisture plus Using M Chef + Conventional heat and Conventional heat Use these functions for cooking with moisture. Dark metal, enamel, or aluminium baking tins with a matt finish, as well as heat-resistant glass, ceramic, and coated bakeware can be used. Place the food on shelf level 2. Using M Chef + Intensive bake and Intensive bake Use these functions for baking cakes with moist toppings. Do not use these functions for baking thin biscuits.
Roasting Tips for roasting - You can use all crockery made from temperature-resistant materials, e.g. roasting dishes and pots (metal lids can only be used with conventional cooking functions), ovenproof glass dishes, roasting bags and tubes, universal trays, wire racks on top of universal trays. You should only use a grilling and roasting insert (if you have one) on the universal tray and a clay pot with conventional cooking functions.
Roasting As a general rule, select the lower temperature given in the chart. If higher temperatures are used than those specified, the meat will brown on the outside, but will not be properly cooked through. When roasting on the wire rack, set a temperature approx. 10 °C lower than for roasting in a roasting dish. Selecting the cooking duration Unless otherwise stated, the durations given in the cooking chart are for an oven which has not been pre-heated.
Roasting Using M Chef + Auto roast and Auto roast Food probe Use these functions for roasting meat, fish and poultry that needs to be well browned as well as sirloin joints and fillet. The oven heats initially to a high searing temperature (approx. 230 °C) during the searing phase. As soon as this temperature has been reached, the oven automatically drops the temperature back down to the preselected cooking temperature (continued roasting temperature). Place the food on shelf level 1.
Roasting Important usage notes - You can place the meat in a pot or on the rack. - The metal tip of the food probe must be fully inserted into the centre of the food so that the temperature sensor reaches more or less to the core. - When cooking poultry, insert the metal tip into the thickest part of the breast. Press the breast with your index finger and thumb to find the thickest part. - The metal tip must not touch any bone or be inserted in areas with a lot of fat.
Roasting Delaying the start of a cooking programme with food probe You can set the cooking process to start at a later time. Select Change | Open further settings and enter a time in the Start at field. In automatic programmes, select Start later. The finish time can be calculated approximately because the duration of a cooking programme is about the same, whether or not the food probe is used.
Grilling Risk of injury caused by hot surfaces. If you grill with the door open, hot air will escape from the oven instead of being cooled by the cooling fan. The control elements will get hot. Grill with the oven door closed. Tips for grilling - Pre-heating is necessary when grilling. Pre-heat the top heat/grill element for approx. 5 minutes with the door closed. Do not use the baking tray. - To grill, brush the wire rack with oil and then place the food on the wire rack. - Trim the meat if necessary.
Grilling Notes on the cooking charts Selecting the cooking duration You can find the cooking charts at the end of this book. Grill thinner cuts of meat/slices of fish for approx. 6–8 minutes per side. It is best to grill food of a similar thickness at the same time so that the cooking durations do not vary too much. Take note of the temperature range, the shelf levels and the durations. These take the size of the meat and cooking practices into account.
Grilling Notes on the functions Using Economy grill You can find an overview of all the functions with their recommended values in “Main and sub-menus”. Use this function to grill flat thin cuts in smaller quantities and for browning small baked dishes. The plastic on the food probe can melt at very high temperatures. Do not use the food probe when using the grill functions. Do not store the food probe in the oven compartment when it is not being used.
Cleaning and care Risk of injury caused by hot Unsuitable cleaning agents surfaces. The Dialog oven gets hot when it is being used. You could burn yourself on the heater elements, oven compartment or accessories. Allow the heater elements, oven compartment and accessories to cool before manual cleaning. To avoid damaging the surfaces, do not use: Risk of injury due to electric shock. The steam from a steam cleaning appliance could reach live electrical components and cause a short circuit.
Cleaning and care If soiling is left on for any length of time, it may become impossible to remove. If items are used frequently without being cleaned, it may become very difficult to clean them. It is therefore best to remove any soiling immediately. The accessories are not dishwasher-safe. Tip: Soiling caused by spilt fruit juices and cake mixtures is best removed while the oven compartment is still warm.
Cleaning and care Removing stubborn soiling Spilt fruit and roasting juices may cause lasting discolouration or matt patches on surfaces. This discolouration will not affect the properties of the surface finish. Do not attempt to remove these stains. Only use the equipment specified. Baked-on deposits can be removed with a glass scraper or with a stainless-steel spiral pad (e.g. Spontex Spirinett), hot water and washing-up liquid.
Cleaning and care Cleaning the oven compartment by means of Pyrolytic Instead of cleaning the oven compartment manually you can run the Pyrolytic function. During pyrolytic cleaning the oven compartment reaches temperatures in excess of 400 °C. Any residual soiling is burnt off and turned to ash by the high temperatures.
Cleaning and care Starting pyrolytic cleaning Risk of injury caused by hot surfaces. The Dialog oven gets much hotter during pyrolytic cleaning than during normal use. Do not let children touch the Dialog oven during Pyrolytic cleaning. Select Maintenance . Select Pyrolytic. Select the level required according to the amount of soiling. Confirm with OK. Follow the instructions on the display. Confirm with OK.
Cleaning and care Risk of injury caused by hot Pyrolytic cleaning interrupted surfaces. At the end of the pyrolytic cleaning programme, the Dialog oven will still be very hot. You could burn yourself on the heater elements, oven compartment or accessories. Allow the heater elements, oven compartment and accessories to cool down before removing any pyrolytic residues or oiling the side runners.
Cleaning and care Descale The frequency of descaling will depend on the water hardness level in your area. Descaling process sequence Once the descaling process has been started it must be completed through to the end. It cannot be cancelled. The descaling process can be run at any time. Descaling takes approx.
Cleaning and care Preparing the descaling process You will need a container of approx. 1 litre capacity. A plastic tube (with suction cup) is supplied with your oven so that you do not have to hold the container with the descaling agent underneath the water intake pipe. We recommend using the descaling tablets supplied. They have been specially developed for Miele for optimum results.
Cleaning and care The amount of solution specified can be more than the amount which is actually taken in. Some of the solution may therefore be left in the container at the end of descaling. A message will appear to confirm that the intake process is completed. Confirm with OK. The activation phase will begin. You can follow the time counting down in the display. Leave the container with the tube connected to the water intake pipe in the oven compartment. Top the container up with approx.
Cleaning and care Evaporating residual moisture Finalising the descaling process After the third rinse residual moisture evaporation will commence. At the end of residual water evaporation, an information window appears with tips on cleaning after the descaling process. Remove the container and tube from the oven compartment. Close the door. Confirm with OK. Danger of injury caused by steam. Steam can cause severe scalding. Do not open the door while the residual water is being evaporated.
Problem solving guide Many malfunctions and faults that can occur in daily operation can be easily remedied. Time and money will be saved because a service call will not be needed. The following guide may help you to find the reason for a malfunction or a fault, and to correct it. Problem Cause and remedy The display is dark. You have selected QuickTouch | Off. When the Dialog oven is switched off, the display is switched off. As soon as the Dialog oven is turned on, the main menu will appear.
Problem solving guide Problem Maximum operating duration appears in the display. reached Cause and remedy The Dialog oven has been operating for an unusually long time. This has triggered the safety switch-off function. Confirm with OK. Touch sensor control to delete the message Process finished. The Dialog oven is ready to use again. F32 appears in the display. The Door lock for pyrolytic cleaning has not locked. Switch the Dialog oven off and then back on again.
Problem solving guide Problem Cause and remedy During a cooking programme with an M Chef function, the cooling fan is running with a very high spin speed. The Dialog oven can get much hotter when using M Chef functions than it does with conventional cooking functions. The spin speed will reduce automatically at the end of the cooking programme. If it happens too frequently, check that the appliance is correctly installed (see “Installation”). With very small amounts of food in the oven (e.g.
Problem solving guide Problem Cause and remedy The food is not sufficiently browned after adding the set number of Gourmet units. A temperature has been set that is too low. Select a higher temperature. For a more intensive browning level, finish cooking the food using a conventional function. The browning of cakes/ The wrong temperature or shelf level was selected. biscuits is uneven. There will always be a slight unevenness in browning.
Problem solving guide Problem Cause and remedy The accessories make noises when being pushed into or pulled out of the oven. The pyrolytic resistant surface of the side runners creates friction when accessories are being pushed into or pulled out of the oven. To reduce the friction, add a few drops of heat resistant cooking oil to some kitchen paper and use this to lubricate the side runners. Repeat this after every pyrolytic cleaning programme. The oven lighting does not switch on.
Service Contact in the event of a fault Warranty In the event of any faults which you cannot remedy yourself, please contact your Miele dealer or the Miele Customer Service Department. For information on the appliance warranty specific to your country please contact Miele. See back cover for address. You can book a Miele Customer Service Department call-out online at www.miele.com/service. Contact information for the Miele Customer Service Department can be found at the end of this document.
*INSTALLATION* Installation Installation dimensions Dimensions are given in mm. Installation in a tall or base unit If the Dialog oven is to be installed in a base unit underneath a hob, please also observe the installation instructions for the hob as well as the building-in depth required for the hob.
*INSTALLATION* Installation Side view 109
*INSTALLATION* Installation Connections and ventilation a Front view b Mains connection cable, length = 2000 mm c No connections permitted in this area d Ventilation cut-out, min.
*INSTALLATION* Installation Installing the Dialog oven For safety reasons, the Dialog oven may only be used when it has been fully installed. The Dialog oven requires a sufficient supply of cool air for efficient operation. The required supply of cool air must not be excessively heated by other heat sources (e.g. solid fuel stoves). The following must be observed when installing the appliance: Do not fit a back panel in the housing unit.
*INSTALLATION* Installation Electrical connection All electrical work should be carried out by a suitably qualified and competent Miele approved service technician in strict accordance with current national and local safety regulations (BS 7671 in the UK). This appliance is supplied with a mains cable for connection to a 220–240 V, 50 Hz single phase supply. The fuse rating must be at least 16 A. The voltage and connected load are given on the data plate situated at the front of the Dialog oven interior.
*INSTALLATION* Installation Electrical connection: Other countries All electrical work should be carried out by a suitably qualified and competent Miele approved service technician in strict accordance with local and national safety regulations. The voltage and rated load are given on the data plate situated at the front of the oven interior. Please ensure that these match the household mains supply.
Cooking charts Batter Cakes/biscuits (accessories) Muffins (tray) Small cakes (1 tray)* [°C] 165 150–160 150 1 170 150 – – – || – – – [min] 25–35 40–50 30–40 15–25 160–170 200 170–180 200 170–180 160 150–160 160 150–160 180 150–160 180 160–170 160 160–170 – 2+3 – – 2 -– 2 – – 2 200 – 2 – – 2 250 2 – – 2 250 – 2 – 2 270 2 – – 2 280 – 2 – – 2 220 – 1 – 2 300 – 2 – – | – ||| – ||| – ||| – ||| – ||| – || – || – 30–40 35–45 60–70 30–40 60–70 30–40 60–70 50–60 65–75 40–50 65–75 55–65 8
Cooking charts Shortcrust pastry Cakes/biscuits (accessories) Biscuits (1 tray) Biscuits (2 trays) Drop cookies (1 tray)* [°C] 150–160 150–160 140 1 160 GU INT [min] 25–35 CF – – – – 2 2+3 2 3 – – – – – – – – 25–35 18–25 25–30 – 2+3 – – 60–70 2 – 2 – – – – Drop cookies (2 trays)* Flan base (flan base tin, 28 cm) Cheesecake (springform cake tin, 26 cm) 180–1901 – 2 – – 20–30 – – – – – – – – – – – – 2 2 2 2 2 2 2 2 2 2 1 2 200
Cooking charts Yeast dough Cakes/biscuits (accessories) Bundt cake (Bundt cake tin, 24 cm) Stollen Streusel cake with/without fruit (tray) Fresh fruit cake (tray) Raisin whirls (tray) White bread (free-form), in 2 cooking stages White bread (loaf tin, 30 cm) 1 Wholegrain bread (loaf tin, 30 cm), in 2 cooking stages Proving yeast dough [°C] 180 170–180 170 150–160 190 170–180 190 200 180 160–170 GU INT – – – – – – – – 200 200 220 2 180 30–35 2 18
Cooking charts Quark dough Cakes/biscuits (accessories) Streusel cake with/without fruit (tray) Apple turnovers (tray) [°C] 190 170–180 180 160–170 GU INT – – – – 3 3 2 2 200 – 130 – || – || – [min] 35–40 45–55 20–30 30–40 CF – – Function, Temperature, Rapid heat-up or Pre-heat (depending on function), Shelf level, GU Gourmet Units, INT Intensity (| Gentle, || Medium, ||| Strong), Duration, CF Crisp function, M Chef + Fan plus, M Chef + Conventional heat, Conve
Cooking charts Choux pastry, puff pastry, meringue Cakes/biscuits (accessories) Choux buns (tray) Pastry puffs (tray) Macaroons (1 tray) Macaroons (2 trays) Apple strudel (tray) [°C] 190 ||| – ||| – – – ||| [min] 30–40 35–45 15–25 30–40 40–50 45–55 30–40 – 45–55 GU INT – 2 350 1 – 2 – 190 210 2 130 180–190 – 2 – 120–130 – 2 – 120–130 – 2+3 – 1 – 2 120 220 1 200–210 – 2 – CF – – Function, Temperature, Rapid heat-up or Pre-heat (depending on function),
Cooking charts Savoury dishes Food (accessories) Savoury flan, shortcrust pastry (tray) Onion tart (tray) Pizza, yeast dough (tray) Pizza, quark dough (tray) Toast* (wire rack) Baked dishes/gratins (e.g.
Cooking charts Beef Food (accessories) [°C] Braised beef, approx. 1 kg 2 150–160 (roasting dish with lid) 2 3 Fillet of beef (rare), 120 approx. 1.3 kg (wire rack 3 130 2 1 on universal tray) 4 100 2 3 Fillet of beef (medium), 120 approx. 1.3 kg (wire rack 3 130 2 1 on universal tray) 4 100 2 3 Fillet of beef (well done), 120 approx. 1.3 kg (wire rack 3 130 2 1 on universal tray) 4 100 2 3 Sirloin joint (rare), 120 approx.
Cooking charts * The settings also apply for testing in accordance with EN 60350-1. 1 Slide the wire rack and universal tray into the oven during the heating-up phase. 2 Sear the meat on the hob first. 3 Pre-heat the oven for 15 minutes before putting food inside. 4 Reduce the temperature after the heating-up phase and continue cooking. 5 Pre-heat the oven for 5 minutes before putting food inside. 6 Add approx. 0.
Cooking charts Pork Food (accessories) Pork joint/pork neck roast, approx. 1.5 kg (roasting dish) Pork joint/pork neck roast, approx. 1.5 kg (roasting dish with lid) Pork joint with crackling, 3 approx. 2 kg (roasting dish), in 2 cooking stages 4 Pork tenderloin, approx. 5 350 g (roasting dish) Pork tenderloin, approx. 5 350 g (wire rack on 1 universal tray) Gammon, approx. 1 kg (dish and wire rack) Gammon joint, approx. 1 kg (wire rack on 5 1 universal tray) Meat loaf, approx.
Cooking charts 1 Slide the wire rack and universal tray into the oven during the heating-up phase. 2 Place the wire rack on shelf level 4 and the universal tray on shelf level 3. 3 3 bursts of steam | Time controlled: Release the first burst of steam 5 minutes after placing the food in the oven, the second burst of steam after 20 minutes and the third burst of steam after 50 minutes. Increase the temperature after 50 minutes. Turn the meat, add approx. 0.5 litres of liquid and continue cooking.
Cooking charts Veal Food (accessories) [°C] Braised veal, approx. 1 kg 2 160 (roasting dish with lid) Fillet of veal (pink), approx. 1 kg 2 1203 1 2 3 (wire rack on universal tray) 120 Fillet of veal (medium), approx. 2 1203 1 kg (wire rack on universal 2 3 1 120 tray) Fillet of veal (well done), approx. 2 1203 1 kg (wire rack on universal 2 3 1 120 tray) 2 3 Saddle of veal (pink), approx. 120 1 kg (wire rack on universal 2 3 1 120 tray) 2 3 Saddle of veal (medium), 120 approx.
Cooking charts Lamb, game Food (accessories) Leg of lamb on the bone, approx. 1.5 kg (roasting dish) Saddle of lamb, off the bone (wire rack on 1 universal tray) Saddle of venison, off the bone (universal tray) Roebuck saddle, off the bone (universal tray) Leg of wild boar, off the bone, approx.
Cooking charts Poultry, fish Food (accessories) [°C] Poultry, 0.8–1.5 kg (wire 230 rack on universal tray) 170–180 Chicken, approx. 1.2 kg 1 (wire rack on universal 190 tray) Poultry, approx. 2 kg 190 2 (e.g. duck) (roasting 220 dish) 180–190 Poultry, approx. 4 kg (e.g. goose) (roasting 160–170 dish) Fish, 200–300 g (e.g. 200 trout) (universal tray) 220–230 Trout, 2 pieces weighing 1 230–250 g each 225 (universal tray) Fish, 1–1.5 kg (e.g.
Gourmet Assistant overview The charts on the following pages list the Gourmet Assistant applications in your Dialog oven. Recipes for items listed in the charts are to be found in the cookbook for your Dialog oven. The cooking function is predefined and cannot be changed. The recommended values for temperature, Gourmet units, intensity and duration can be altered. If you wish to cook larger or smaller amounts than specified in the recipes, use a correspondingly larger or smaller tray or container, e.g.
Gourmet Assistant overview Gourmet Assistant Bread (recipe: “Focaccia”) Round baking tray (0.3 times the amount of ingredients) Universal tray (specified amount of ingredients) Focaccia White bread (recipe: “White bread, fresh”) (specified amount of ingredients) 1000 g (1.25 times the amount of ingredients) Rectangular tin 25 cm (recipe: “White herb bread”, 0.
Gourmet Assistant overview Gourmet Assistant Pizza & Quiche (recipe: “Sausage rolls”) 4 pieces (0.7 times the amount of ingredients) 6 pieces (specified amount of ingredients) 8 pieces (1.
Gourmet Assistant overview Gourmet Assistant Fish (recipe: “Salmon gratin”) 2 portions (0.3 times the amount of ingredients) 4 portions (0.7 times the amount of ingredients) 6 portions (specified amount of ingredients) 8 portions (1.
Gourmet Assistant overview Gourmet Assistant Bakes & gratins (recipe: “Potato gratin”) 2 portions (half the quantity of ingredients) 4 portions (specified amount of ingredients) 6 portions (1.5 times the amount of ingredients) 8 portions (double the amount of ingredients) Lasagne (recipe: “Lasagne”) 2 portions (half the quantity of ingredients) 4 portions (specified amount of ingredients) 6 portions (1.
Overview of Automatic programmes The charts on the following pages list the factory-set Automatic programmes on your Dialog oven. The recipes for these programmes are in the cookbook for your Dialog oven.
Overview of Automatic programmes Automatic programmes Cookies/Muffins Biscuits Raisin whirls Chocolate cherry muffins Drop cookies Vanilla biscuits Walnut muffins Choux buns Bread Focaccia Plaited loaf Marbled plaited yeast loaf White herb bread Tiger bread White bread, fresh Granary bread Mixed grain bread, fresh Mixed grain bread, frozen Ginger loaf Rolls Croissants Raisin rolls Chocolate rolls White rolls, fresh White rolls, frozen 133
Overview of Automatic programmes Automatic programmes Pizza & Quiche Vegetarian flan Cheese flan Kohlrabi strudel with lobster Salmon en croûte Pizza Yeast dough Quark and oil dough Quiche Lorraine Spinach in puff pastry Tomato Ricotta quiche Savoy cabbage strudel Sausage rolls Meat Poultry Duck Chicken Stuffed turkey breast Veal Fillet of veal Loin of veal Beef Fillet of beef Sirloin joint Pork Meat loaf Gammon joint Pulled pork Pork roast Stuffed fillet of pork Fillet of pork en croute 134
Overview of Automatic programmes Automatic programmes Fish Sea bream with vegetables Fish in ice Cod with a herb topping Confit salmon Salmon pie Salmon gratin Stuffed salmon trout Sea bass in a salt crust Zander on a bed of herbs Seafood Vegetables and prawns Confit scallops Thai mussels Bakes & gratins Chicory gratin Potato gratin Lasagne Moussaka Pasta bake Paella Shepherd's pie Terrine & Co Meat paté Chicken and lobster terrine Salmon terrine 135
Overview of Automatic programmes Automatic programmes Vegetables Antipasti Aubergine White mushrooms Peppers Baked cauliflower Fennel with Prosecco Mixed vegetables Ratatouille Asparagus Oriental root vegetables Courgette gratin Dessert Pineapple gratin Baked yeast dumplings Crème caramel Crumble Raspberry soufflé Pumpkin soufflé Key lime pie Chocolate delight 136
Conformity declaration EU Conformity declaration UK Conformity declaration Miele hereby declares that this oven complies with Directive 2014/53/EU. Miele hereby declares that this oven complies with UK Radio Equipment Regulations 2017, as amended. The complete text of the EU declaration of conformity is available from one of the following internet addresses: - Products, Download from www.miele.ie - For service, information, operating instructions etc: go to www.miele.
Copyright and licences Miele uses software to operate and control the appliance. The copyright authorisation from Miele and other relevant software suppliers (e.g. Adobe) must be respected. Miele and their suppliers reserve the rights to the software components. In particular the following are prohibited: - copying and distribution, - modifications and derivations, - decompilation, reverse engineering, disassembling and other such reductions of software.
United Kingdom Miele Co. Ltd., Fairacres, Marcham Road, Abingdon, Oxon, OX14 1TW Tel: 0330 160 6600, Internet: www.miele.co.uk/service, E-mail: info@miele.co.uk Australia Miele Australia Pty. Ltd. ACN 005 635 398 ABN 96 005 635 398 Level 4, 141 Camberwell Road Hawthorn East, VIC 3123 Tel: 1300 464 353 Internet: www.miele.com.au Ireland Miele Ireland Ltd. 2024 Bianconi Avenue Citywest Business Campus Dublin 24 Tel: (01) 461 07 10 Fax: (01) 461 07 97 E-Mail: info@miele.ie Internet: www.miele.
DO 7860 en-GB M.-Nr.