
Operating instructions/Installation instructions
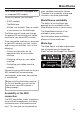
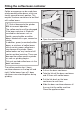
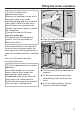
Table Of Contents
- Contents
- Warning and Safety instructions
- Guide to the machine
- Controls and indicators
- Operation
- Miele@home
- Before using for the first time
- Filling the coffee bean container
- Filling the water container
- Switching on and off
- Spout adjustment
- Making drinks
- Expert mode
- Grinder setting
- Parameters
- Profiles
- MobileStart
- Settings
- Cleaning and care
- Overview of cleaning intervals
- Cleaning by hand or in the dishwasher
- Unsuitable cleaning agents
- Cleaning the drip tray and waste container
- Cleaning the drip tray cover
- Water container
- Cleaning the central spout
- Cleaning the cup rim sensor
- Cleaning the milk flask with lid
- Cleaning the milk valve (daily)
- Removing and cleaning the milk valve (once a month)
- Cleaning the bean containers
- Removing the brew unit and cleaning it by hand
- Cleaning the interior, inside of the machine door and drip tray
- Cleaning the front of the machine
- Maintenance programmes
- _
- _
- Cleaning the milk pipework
- Degreasing the brew unit and cleaning the interior
- Descaling the machine
- Problem solving guide
- After sales service and warranty
- Accessories
- Installation
- Technical data
- EU Conformity declaration
- UK Conformity declaration

Before using for the first time
24
Before using for the first time
Connect the coffee machine to the
water and electricity supplies.
Install the coffee machine by building
it in.
Remove any notices from the
machine.
Remove the protective foil from the
drip tray cover.
Clean the water container, the bean
containers and the central spout.
Remove the bean containers and fill
them with roasted coffee beans.
Switching on for the first time
Touch theOn/Offbutton.
Selecting the display language
Select the desired display language.
You might also be asked for your
location.
The choice of location determines how
the time of day is displayed, e.g. in the
12 or 24-hour format, as well as how
units are displayed and so on.
Setting up the network (Miele@home)
You can connect your coffee machine
to your home WiFi network.
The following appears in the display
during set-up: Set up “Miele@home”
Tip: You can also choose to set up
Miele@home for your coffee machine at
a later point. In this case, select Skip.
Make sure that your WiFi network
signal is sufficiently strong in the
place where you want to set up your
coffee machine.
Touch Continue.
Select the connection method you
wish to use.
Follow the instructions provided in
the coffee machine display and in the
Miele app.
Connection successfully established. will
appear in the display.
Touch Continue to proceed with the
set-up.
Setting the date
Set the current date and touchOK.
Setting the time of day
Set the current time of day and
touchOK.
If the coffee machine has been
connected to a WiFi network and is
signed into the Miele app, the time will
be synchronised based on the location
setting in the Miele app.
Setting the water hardness level
Contact your local water supplier to
find out your local water hardness
range if necessary.
More information can be found under
“Settings – Water hardness”.
Enter your local water hardness (in
°dH) and confirm withOK.