
Operating and Installation instructions

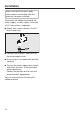
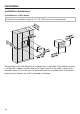
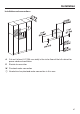
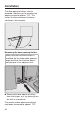
Table Of Contents
- Contents
- IMPORTANT SAFETY INSTRUCTIONS
- Guide to the appliance
- Controls and indicators
- Operation
- Before first use
- Filling the coffee bean container
- Filling the water tank
- Switching on and off
- Dispenser adjustment
- Preparing beverages
- Expert Mode
- Grinder setting
- Parameters
- Profiles
- MobileStart
- Settings
- Cleaning and care
- Overview of cleaning intervals
- Clean by hand or in dishwasher
- Unsuitable cleaning agents
- Cleaning the drip tray and grounds container
- Cleaning the drip-tray cover
- Water container
- Cleaning the main dispenser
- Cleaning the cup-rim sensor
- Cleaning the milk flask with lid
- Cleaning the milk valve (daily)
- Removing and cleaning the milk valve (once a month)
- Cleaning the bean containers
- Cleaning the interior, inside of the machine door, and drip tray
- Cleaning the front of the machine
- Maintenance programs
- _
- _
- Cleaning the milk pipework
- Degreasing the brew unit and cleaning the interior
- Descaling the appliance
- Frequently Asked Questions
- Service and warranty
- Accessories
- Caring for the environment
- Installation
- FCC Declaration of Conformity

Installation
*INSTALLATION*
90
The door opening limiters can be
removed, allowing you to increase the
opening angle to approx.170°. This
makes it easier to remove the bean
containers, for example.
Removing the door opening limiters
Make sure that sufficient space is
available for the larger door opening
angle and that the machine door is
not going to hit an adjacent wall.
Remove the door opening limiters
from the hinges, e.g., by prizing them
out with a screwdriver.
The machine door opening angle has
now been increased to approx.170°.