
Operating and Installation instructions
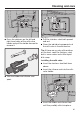

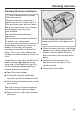
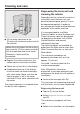
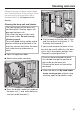
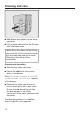
Table Of Contents
- Contents
- IMPORTANT SAFETY INSTRUCTIONS
- Guide to the appliance
- Controls and indicators
- Operation
- Before first use
- Filling the coffee bean container
- Filling the water tank
- Switching on and off
- Dispenser adjustment
- Preparing beverages
- Expert Mode
- Grinder setting
- Parameters
- Profiles
- MobileStart
- Settings
- Cleaning and care
- Overview of cleaning intervals
- Clean by hand or in dishwasher
- Unsuitable cleaning agents
- Cleaning the drip tray and grounds container
- Cleaning the drip-tray cover
- Water container
- Cleaning the main dispenser
- Cleaning the cup-rim sensor
- Cleaning the milk flask with lid
- Cleaning the milk valve (daily)
- Removing and cleaning the milk valve (once a month)
- Cleaning the bean containers
- Cleaning the interior, inside of the machine door, and drip tray
- Cleaning the front of the machine
- Maintenance programs
- _
- _
- Cleaning the milk pipework
- Degreasing the brew unit and cleaning the interior
- Descaling the appliance
- Frequently Asked Questions
- Service and warranty
- Accessories
- Caring for the environment
- Installation
- FCC Declaration of Conformity

Cleaning and care
61
Press the retainers on the left and
right-hand sides of the milk-valve
holder and pull the holder forward to
remove it.
Take the holder and silicone seal
apart.
Pull the stainless-steel bolt upward
and out.
Clean the individual components of
the milk valve in the dishwasher.
Tip: If there are any dry milk residues
on the front, soak the stainless-steel
bolt in warm water and a little liquid
dish soap.
Installing the milk valve
Insert the stainless-steel bolt from
above.
Insert the silicone seal into the milk-
valve holder.
Insert the holder and silicone seal
until they audibly click into place.