
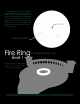
Assembly Instructions


i
Please follow local building codes prior to excavation, construction and assembly of your
project.
Whether you’re planning on doing the project yourself or hiring a professional, every
project requires a call to mark your utility lines.
1. Remove Sod
Excavate the installation area to approximately 6”larger on all sides than the actual
nished patio.
2. Prepare & Compact Base
Lay landscape fabric. Install paver base and thoroughly compact to a nished
thickness of 4”.
3. Screed Sand
Layout 1”diameter pipe on base. Pour 1”of play sand over compacted base. Screed
play sand by dragging a 2’x 4”board over pipe.
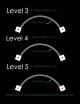
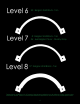
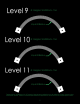
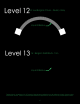
4. Lay Pavers
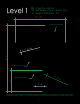
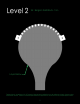
Lay paver stones according to the layout shown on level 1. The Flagstone pavers will
need to be cut to t the outer edge of the circle.
5. Compact & Spread Sand
Compact the installed pavers with a plate compactor in both directions at least
two passes. Once compacted, spread play sand on the installation and sweep into joints.
Remove any remaining sand from the top of the patio. You can substitute paver locking
sand in place of play sand to inhibit weed growth.
CHECK LIST:
ADDITIONAL ITEMS FOR INSTALLING THE PATIO:
Chisel Standard Hammer
Eye Protection
1” Diameter Pipe
Level
Shovel
Work Gloves
Dust MaskTape Measure
Caulk Gun
Broom
Utility Knife
Rubber Mallet
2x4 Board
A compactor will be required to compact the base of your patio.
In some cases, you will be required to cut concrete blocks, a block splitter or circular
saw tted with a masonry cutting blade is an ideal tool to work with.
BE PREPARED:
INSTALLING PAVERS: