
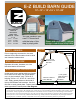
Assembly Instructions
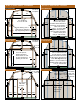


For your doors, cut two 4'×8' sheets of siding
to 48"×94". Cut 1×4 boards and attach 1½"
in from the top & sides of the interior sides of
the doors. On one door extend a 1×4 board
out 1" at the center. Ensure that bottom
boards clear oor sheathing and treated end
frame joist. Bend protruding 8d nails. Cut and
fasten 2×4 cross braces. Miter 1×6 frame &
stile, and 1×4 crossbuck trim boards for the
exterior of the door with cross trim as shown
in the diagram. Apply hinges and hasp.
While still on a at surface, attach 1×4 trim
to front wall frame and fasten doors.
At base of building, measure diagonally.
Adjust until AD=BC. Building is then
square.
From treated 2×4’s cut four 21¼" oor supports.
Cut 22½" oor supports:
• 8 for a 12' building
•12 for a 16' building
•16 for a 20' building
See diagram. Use 10d nails.
From treated 2×4’s cut rim joists:
• 143" for a 12'
• 191" for a 16'
• 239" for a 20'
Place the cut rim joists 12' apart.
Brace front and back walls up at
the proper ends. Nail rim joists to
the walls using 10d nails. Stand
the remaining frames up:
• 5 for a 12' bldg
• 7 for a 16' bldg
• 9 for a 20' bldg.
Nail to rim joists. Install a
temporary brace across low
roof member. See diagram.
Floor Supports
A
C
B
D
Square
Building
Framed Building
Doors
Temporary
braces
Standard
Frames
12'×12'
Building
Shown
21¼"
22½"
22½"
143"
22½" 22½" 22½" 22½" 21¼"
1½"
Nail in place
2×4 treated oor
supports. (typical)
21¼"
22½"
22½"
1½"
Outside
edge of
frame to
outside edge
of frame
Front wall shown
with optional T1-11 siding
46½"
45¾"
45¾"
21¼"
12'
12'×12' oor
plan shown
1
11
⁄16"
1¾"
1
11
⁄16"1
13
⁄16"
59
9
⁄16"
1
13
⁄16"
2×4
Brace
Treated end frame Joist
1"
1½" Gap, Top & Sides
1×4
Pine
Boards
STEP 6. DOORS
STEP 7. RAISE FRAMES
STEP 8. SQUARE BUILDING
STEP 9. FLOOR SUPPORTS
12"
12"
23"
23"
23"
A
C
D
E
F
B
5½"
44¼"
44¼"
94"
A & B
TOPS
1
11
⁄16"
1¾"
1
13
⁄16"
25"
C-F