
Assembly Instructions
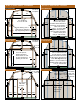


STEP 4. END WALL FRAMING STEP 5. END WALL SIDING
Back Wall Frame
3½"
96"
91¾"
18¾"
18¾"
1"
20½"
20½"
20½"
20½"
2×4×8' end
wall studs
cut to t.
2×4 studs and
2×4×10' nailer
cut to t
Front Wall Siding
For Rollup Door
108"
48"
18"
18"
48"
1"
For Rollup Door:
Cut a 4×8 sheet into two
24"×96" pieces. Position
sheets and frame face down
on at surface. Mark and cut
lines. See diagram. Keep
sheets 1" up from bottom of
treated boards. Nail in place
every 8" with 6d nails.
Front Wall Siding
48"
24" 24"
48"
1"
1"
1"
1"
Cut a 4×8 sheet into
two 24"×96" pieces.
Position sheets and frame
face down on at surface.
Mark and cut lines.
Leave 1" for doors. See
diagram. Keep sheets 1"
up from bottom of treated
boards. Nail in place
every 8" with 6d nails.
Front Wall Frame
for Rollup Door
3½"
2½"
96"
84"
91¾"
11"
48"48"
1"
108"
Nail Studs
into place
For a roll-up door,
header opening to
exact size 9'×7'. Roll-
up door will have an
opening of 108"×84".
2×4×10'
cut to t
Back Wall Siding
48" 48"
48"
48"
48"
1"
Attach this full
4×8 sheet of
siding rst.
Nail a full 4×8 sheet rst.
Flip frame onto positioned sheets.
Trace and cut lines. Flip again, nail.
Keep sheets 1" up from bottom of
treated boards.
Front Wall Frame
3½"
96"
91¾"
18"
25"
48"48"
1"
94"
2×4 studs and
2×4×10' cut to t
Extra bracing of 2×4
studs may be desired to
help support large doors.
Nail Studs
into place