OPERATIONS ARCTIC THUNDER
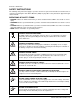
CHAPTER 1 OPERATION SAFETY INSTRUCTIONS The following safety instructions apply to operators and service personnel. Read these instructions before servicing or preparing the Video Game Machine (VGM) for play. Other safety instructions appear throughout this manual. DEFINITIONS OF SAFETY TERMS • DANGER indicates an imminent hazard. If you fail to avoid this hazard, it WILL cause death or serious injury. • WARNING indicates a potential hazard.
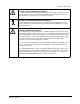
CHAPTER 1 OPERATION CAUTION: ATTACH CONNECTORS PROPERLY. Be sure board connectors mate properly. If connectors do not slip on easily, do not force them. A reversed connector may damage the VGM and void the warranty. Connector keys only allow a connector to fit one set of pins on a board. CAUTION: USE CARE WHEN SHIPPING HARD DISKS. The hard disk drive must be packed in an anti-static bag. When shipping the drive for repair or replacement, pack it in an approved container (P/N 08-8068).
CHAPTER 1 OPERATION PRODUCT SPECIFICATIONS Operating Requirements Location Domestic Foreign Japan Electrical Power 120VAC @ 60Hz 4.0 Amps 230VAC @ 50Hz 2.0 Amps 100VAC @ 50Hz 4.0 Amps Temperature 32°F to 100°F (0°C to 38°C) Humidity Not to exceed 95% relative Cabinet Statistics Shipping Dimensions Width 30" (76.2 cm) Depth 62" (157.4 cm) Height 78" (198 cm) Shipping Weight (Approx.) 350Lbs (158kg) Main Cabinet 125Lbs (57kg) Seat Assy.
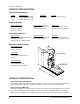
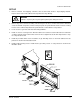
CHAPTER 1 OPERATION SET-UP 1. Remove all items from shipping containers and set them aside. Remove all packaging material. Inspect exterior of the main cabinet and seat pedestal for any damage. WARNING Cabinet is top heavy. Do not push against plastic parts during movement. 2. Remove keys from controller assembly. Unlock and open rear door, coin box and cash box. Electrical cords, mechanical components, and assorted spare parts are packed inside cash box.
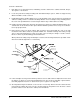
CHAPTER 1 OPERATION 7. Roll cabinet to its intended location, maintaining clearance between the cabinet and walls, drapes, other games or obstructions. 8. Locate the pedestal assembly mounting rails and rubber bumper spacers, which are shipped along with the hardware, inside a cash box. 9. Install rubber bumpers. Rubber bumpers are used to maintain a 3/16” space between the pedestal and cabinet assembly, and are essential in absorbing vibration.
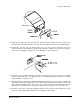
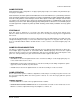
CHAPTER 1 OPERATION TYPICAL REAR DOOR HASP INSTALLATION 14. Modify the lock plate at the top of the rear door. Remove the bolts and nuts from the lock plate, then rotate the plate so that the slot will be above the door. Reinstall the bolts and nuts and tighten firmly. 15. Reinstall the rear door onto the cabinet and close it. Lock the rear door and remove the key. If required, install the extra padlock through the hasp at this time.
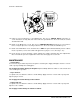
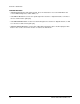
CHAPTER 1 OPERATION TYPICAL COIN DOOR SWITCH LOCATION 19. Follow on-screen instructions to select Diagnostics, then choose SWITCH TESTS. Follow the onscreen instructions to verify that each of the controls is operational. If no errors are found, the controls should function well. 20. Return to the Diagnostics screen, then choose CONTROLLER TEST. Follow the on-screen instructions to verify the presence of steering resistance. If no errors are found, the aim will be good. 21.
CHAPTER 1 OPERATION GAME FEATURES Arctic Thunder™ ships configured for one-player game play, but up to four cabinets may be linked to promote player competition. Arctic Thunder™, the action packed snowmobile tour for the new millennium, is a polar fantasy that transports adventurous trekkers across continents in search of unimaginable and ultra-realistic thrills and chills.
CHAPTER 1 OPERATION CONTROL BUTTONS • TEST BUTTON activates game Menu System. Press the Test button to access the Main Menu and select individual diagnostics, audits, utilities, etc. • VOLUME-UP BUTTON is used to move up through menu selections or adjustment items, as well as to increase volume level in game play. • VOLUME-DOWN BUTTON is used to move down through menu selections or adjustment items, as well as to decrease volume level in game play.